Lecture 9
- Web programming
- Flask
- Forms
- Layouts
- POST
- MVC
- Frosh IMs
- Storing data
- Emails
- Sessions
- store, shows
- Searching
Web programming
- Today, we’ll use all the tools and technologies we’ve learned to build applications for the web.
- Last week, we used
http-serveras a web server in VS Code. This program listens for connections and requests, and responds with static content, like HTML files and images. Buthttp-servercan’t process other types of requests, like form inputs from the user. - Recall that a URL might look like
http://www.example.com/, for the site’s default page, orhttp://www.example.com/file.htmlfor a specific file. A file might be in a folder, likefolder/file.html, and that reference is known as a path. A path can also be called a route, which does not need to refer to an actual file. - A URL can also include form inputs, like:
http://www.example.com/route?key=value - An HTTP request for a route with inputs might look like:
GET /search?q=cats HTTP/1.1 Host: www.google.com ...- Now, we need a web server that can parse, or analyze, HTTP request headers and return different pages based on the route.
Flask
- We’ll use Python and a library called Flask to write our own web server.
- Flask is also a framework, where the library of code also comes with a set of conventions for how it should be used. For example, like other libraries, Flask includes functions we can use to parse requests individually, but as a framework, also requires our program’s code to be organized in a certain way:
app.py requirements.txt static/ templates/app.pywill have the Python code for our web server.requirements.pyincludes a list of required libraries for our application.static/is a directory of static files, like images and CSS and JavaScript files.templates/is a directory for HTML files that will form our pages.
- Other web server frameworks will have a different set of conventions and requirements.
- Let’s write a simple web server by creating an
app.pyin VS Code:from flask import Flask, render_template, request app = Flask(__name__) @app.route("/") def index(): return render_template("index.html")- First, we’ll import
Flaskfrom theflasklibrary, along with some other functions. - Then, we’ll create an
appvariable by giving our Python file’s name to theFlaskvariable. - Next, we’ll label a function for the
/route with@app.routefrom Flask. The@symbol in Python is called a decorator, which modifies a function. - Finally, our
index()function will just render a template, or return HTML code, from the fileindex.html.
- First, we’ll import
- Now, we’ll need to create a
templates/directory, and create anindex.htmlfile with some content inside it:<!DOCTYPE html> <html lang="en"> <head> <meta name="viewport" content="initial-scale=1, width=device-width"> <title>hello</title> </head> <body> hello, world </body> </html> - Now, typing
flask runwill return that HTML file when we visit our server’s URL: ``` $ flask run- Environment: development
- Debug mode: off
- Running on https://student50-code50-5000.githubpreview.dev/ (Press CTRL+C to quit)
- Restarting with stat ```
- We can change the URL by adding
/?name=David, but our page stays the same. We’ll need to change our code inapp.py:from flask import Flask, render_template, request app = Flask(__name__) @app.route("/") def index(): name = request.args.get("name") return render_template("index.html", name=name)- We can use the
requestvariable from the Flask library to get the arguments from the request. Then, we can pass in thenamevariable as an argument to therender_templatefunction.
- We can use the
- In our HTML file, we can include that variable with two curly braces:
<!DOCTYPE html> <html lang="en"> <head> <meta name="viewport" content="initial-scale=1, width=device-width"> <title>hello</title> </head> <body> hello, {{ name }} </body> </html> - Now, if we visit our URL with our input, we’ll see that the page’s content now includes it.
- To make sure our templates are reloaded, we can press
controlandCin the terminal window to exit Flask, and restart our server withflask runagain.
Forms
- In
index.html, we’ll create a form:<!DOCTYPE html> <html lang="en"> <head> <meta name="viewport" content="initial-scale=1, width=device-width"> <title>hello</title> </head> <body> <form action="/greet" method="get"> <input autocomplete="off" autofocus name="name" placeholder="Name" type="text"> <input type="submit"> </form> </body> </html>- We’ll send the form to the
/greetroute, and have an input for thenameparameter as well as a submit button.
- We’ll send the form to the
- Now, when we refresh our page and submit the form, we see that the URL has changed to something like
/greet?name=David, and a page that says “Not Found”. - In
app.py, we’ll need to add a function for the/greetroute with what we had in theindex()function before:@app.route("/") def index(): return render_template("index.html") @app.route("/greet") def greet(): name = request.args.get("name") return render_template("greet.html", name=name)- Meanwhile, our
index()function will just return theindex.htmlpage with the form.
- Meanwhile, our
- When we submit our form this time, we see an “Internal Server Error” on the page. We can go back to our terminal window where
flask runwill show more details:[2021-11-10 00:17:18,559] ERROR in app: Exception on /greet [GET] Traceback (most recent call last): ... File "/usr/local/lib/python3.10/site-packages/flask/templating.py", line 89, in _get_source_fast raise TemplateNotFound(template) jinja2.exceptions.TemplateNotFound: greet.html 127.0.0.1 - - [8/Nov/2021 19:05:28] "GET /greet?name=David HTTP/1.0" 500 -``- We see that the request was indeed for the correct route, but it appears that Flask couldn’t find the template called
greet.html.
- We see that the request was indeed for the correct route, but it appears that Flask couldn’t find the template called
- We’ll have to create a new file in
templatescalledgreet.htmland use thenamevariable as before:<!DOCTYPE html> <html lang="en"> <head> <meta name="viewport" content="initial-scale=1, width=device-width"> <title>hello</title> </head> <body> hello, {{ name }} </body> </html> - Now, if we restart our server, we can see our form at the default page, and use the input from the user to generate another page from a template.
- It turns out that the
getfunction allows for a default value, so we can write:@app.route("/greet") def greet(): name = request.args.get("name", "world") return render_template("greet.html", name=name)- Now, if someone visits our URL with just
/greet, thenamevariable will be set toworldby default.
- Now, if someone visits our URL with just
- But, if someone uses our form and provides no input, the URL becomes
/greet?name=, andnamewill actually have a value of a blank string. We can add therequiredattribute to our form inindex.html, but we can’t rely on that safety check, since, as we saw last week, anyone can change our page on the client-side with Developer Tools in the browser.
Layouts
- In
index.htmlandgreet.html, we have some repeated HTML code. With just HTML, we aren’t able to share code between files, but with Flask templates (and other web frameworks), we can factor out such common content. - We’ll create another template,
layout.html:<!DOCTYPE html> <html lang="en"> <head> <title>hello</title> </head> <body> {% block body %}{% endblock %} </body> </html>- With the
{% %}syntax, we can include placeholder blocks, or other chunks of code. Here we’ve named our blockbodysince it contains the HTML that should go in the<body>element.
- With the
- In
index.html, we’ll use thelayout.htmlblueprint and only define thebodyblock with:{% extends "layout.html" %} {% block body %} <form action="/greet" method="post"> <input autocomplete="off" autofocus name="name" placeholder="Name" type="text"> <input type="submit"> </form> {% endblock %}- Now, we can have just our
<form>element inindex.html. The template code, in{% %}, indicates to Flask that we wantindex.htmlto use another template,layout.html, and substitute this code in the{% block body %}placeholder.
- Now, we can have just our
- Similarly, in
greet.html, we define thebodyblock with just the greeting:{% extends "layout.html" %} {% block body %} hello, {{ name }} {% endblock %}- The templating language is actually called Jinja, and understood by Flask.
- Now, if we restart our server, and view the source of our HTML after opening our server’s URL, we see a complete page with our form inside our HTML file, generated by Flask:
<!DOCTYPE html> <html lang="en"> <head> <meta name="viewport" content="initial-scale=1, width=device-width"> <title>hello</title> </head> <body> <form action="/greet" method="get"> <input autocomplete="off" autofocus name="name" placeholder="Name" type="text"> <input type="submit"> </form> </body> </html>- Our indentation is no longer perfect, but that’s acceptable since now our source code has the proper indentation, and Flask is using that to generate the page.
- Since our HTML pages are now generated by logic in code, we’ve built a web application.
POST
- Our form above used the GET method, which includes our form’s data in the URL.
- We’ll just need to change the
methodin our HTML form:<form action="/greet" method="post">. - Now, when we visit our form and submit it, we see another error, “Method Not Allowed”.
- Our controller will also need to be changed to accept the POST method, and look for the input from the form:
@app.route("/greet", methods=["POST"]) def greet(): return render_template("greet.html", name=request.form.get("name", "world"))- While
request.argsis for inputs from a GET request, we have to userequest.formin Flask for inputs from a POST request.
- While
- Now, when we restart our application after making these changes, we can see that the form takes us to
/greet, but the contents aren’t included in the URL anymore. - Note that when we reload the
/greetpage, the browser asks us to confirm the form submission, since it’s temporarily remembering the inputs. - GET requests are useful since they allow the browser to save the contents of the form in history, and allow links that include information as well, like https://www.google.com/search?q=what+time+is+it.
MVC
- The Flask framework implements a particular paradigm, or way of thinking and programming. This paradigm, also implemented by other frameworks, is known as MVC, or Model–view–controller:
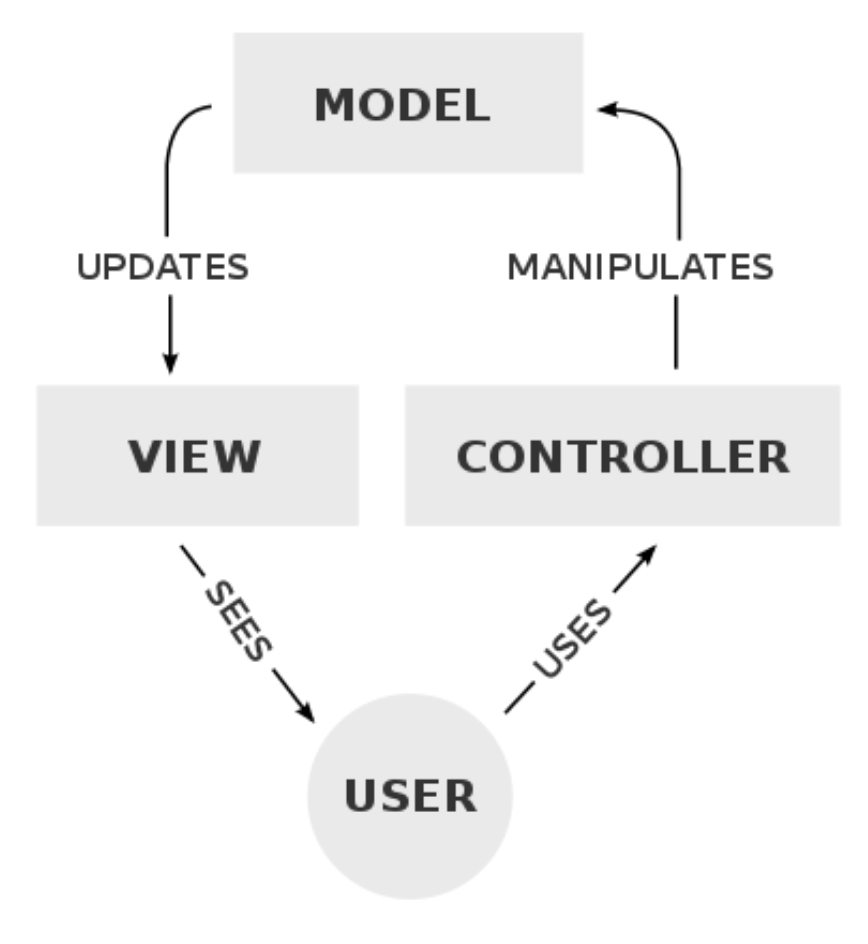
- The controller contains our “business logic”, code that manages our application overall, given user input. In Flask, this will be our Python code in
app.py. - The view includes templates and visuals for the user interface, like the HTML and CSS that the user will see and interact with.
- The model is our application’s data, such as a SQL database or CSV file, which we haven’t yet used.
- The controller contains our “business logic”, code that manages our application overall, given user input. In Flask, this will be our Python code in
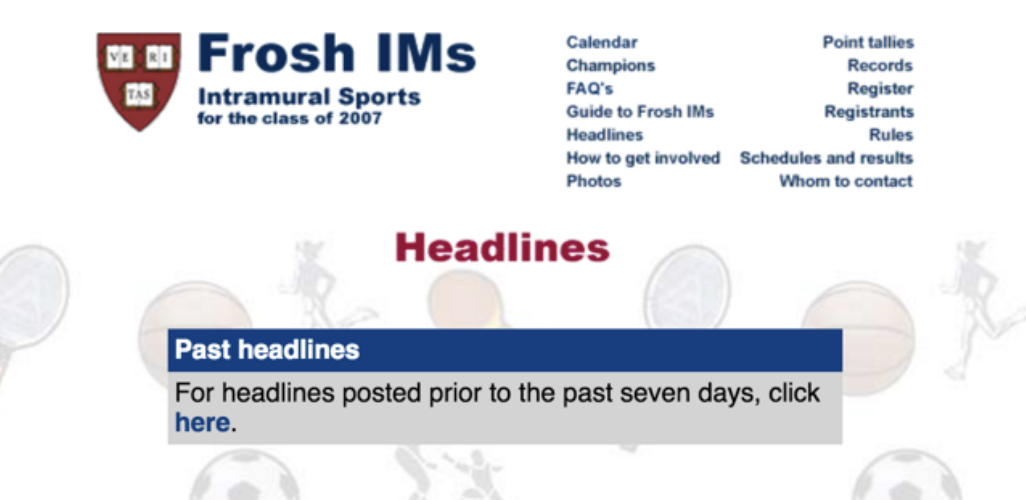
Frosh IMs
- One of David’s first web applications was for students on campus to register for “frosh IMs”, intramural sports:
- We’ll use a
layout.htmlsimilar to what we had before:<!DOCTYPE html> <html lang="en"> <head> <meta name="viewport" content="initial-scale=1, width=device-width"> <title>froshims</title> </head> <body> {% block body %}{% endblock %} </body> </html> - In our
app.py, we’ll return ourindex.htmltemplate for the default/route:from flask import Flask, render_template, request app = Flask(__name__) @app.route("/") def index(): return render_template("index.html") - Our
index.htmltemplate will look like this:{% extends "layout.html" %} {% block body %} TODO {% endblock %} - We’ll run our server and load the page just to see that everything is working so far.
- Let’s add a form to the
index.htmltemplate:{% extends "layout.html" %} {% block body %} <h1>Register</h1> <form action="/register" method="post"> <input autocomplete="off" autofocus name="name" placeholder="Name" type="text"> <select> <option disabled selected>Sport</option> <option value="Basketball">Basketball</option> <option value="Soccer">Soccer</option> <option value="Ultimate Frisbee">Ultimate Frisbee</option> </select> <input type="submit" value="Register"> </form> {% endblock %}- We’ll plan to have a
/registerroute, and have a<select>menu, which looks like a dropdown menu with options for each sport.
- We’ll plan to have a
- In
app.py, we’ll allow POST for our/registerroute:@app.route("/register", methods=["POST"]) def register(): # Validate submission if not request.form.get("name") or request.form.get("sport") not in ["Basketball", "Soccer", "Ultimate Frisbee"]: return render_template("failure.html") # Confirm registration return render_template("success.html")- We’ll check that our form’s values are valid, and then return a template for either failure or success depending on the results.
failure.htmlwill have:{% extends "layout.html" %} {% block body %} You are not registered! {% endblock %}- And
success.htmlwill have:{% extends "layout.html" %} {% block body %} You are registered! {% endblock %} - Notice that our application doesn’t actually save the data anywhere yet.
- When we run this application, though, we see that we are not registered, even if we fill out the form.
- We can open the Developer Tools in Chrome, using the Network tab like we did last week, and submit our form again to see the request our browser actually made:

- At the very bottom, we see that the form data only has
name: David.
- At the very bottom, we see that the form data only has
- It turns out that our
<select>input needs a name ofsportto be sent to the server:{% extends "layout.html" %} {% block body %} <h1>Register</h1> <form action="/register" method="post"> <input autocomplete="off" autofocus name="name" placeholder="Name" type="text"> <select name="sport"> <option disabled selected>Sport</option> <option value="Basketball">Basketball</option> <option value="Soccer">Soccer</option> <option value="Ultimate Frisbee">Ultimate Frisbee</option> </select> <input type="submit" value="Register"> </form> {% endblock %}- Now our server will be able to get the input with
request.form.get("sport").
- Now our server will be able to get the input with
- We can also link to CSS in
layout.html:<!DOCTYPE html> <html lang="en"> <head> <meta name="viewport" content="initial-scale=1, width=device-width"> <link href="/static/styles.css" rel="stylesheet"> <title>froshims</title> </head> <body> {% block body %}{% endblock %} </body> </html>- By Flask’s convention, we’ll have a directory called
staticfor files like images and CSS.
- By Flask’s convention, we’ll have a directory called
- We can improve the design of our application by having a single list of sports:
from flask import Flask, render_template, request app = Flask(__name__) SPORTS = [ "Basketball" "Soccer", "Ultimate Frisbee" ] @app.route("/") def index(): return render_template("index.html", sports=SPORTS) ...- Then, we’ll pass that list into the
index.htmltemplate.
- Then, we’ll pass that list into the
- In our template, we can use a loop to generate a list of options from the list of strings passed in as
sports:... <select name="sport"> <option disabled selected value="">Sport</option> {% for sport in sports %} <option value="{{ sport }}">{{ sport }}</option> {% endfor %} </select> ...- The
forandendforsyntax creates a loop, and now we can programmatically create an<option>element for each sport in our list.
- The
- Finally, we can check that the
sportsent in the POST request is in the listSPORTSinapp.py:... @app.route("/register", methods=["POST"]) def register(): if not request.form.get("name") or request.form.get("sport") not in SPORTS: return render_template("failure.html") return render_template("success.html")- Now, to add another sport, we only need to change the
SPORTSlist.
- Now, to add another sport, we only need to change the
- We can change the select menu in our form to be checkboxes, to allow for multiple sports:
{% extends "layout.html" %} {% block body %} <h1>Register</h1> <form action="/register" method="post"> <input autocomplete="off" autofocus name="name" placeholder="Name" type="text"> {% for sport in sports %} <input name="sport" type="checkbox" value="{{ sport }}"> {{ sport }} {% endfor %} <input type="submit" value="Register"> </form> {% endblock %}- We’ll make sure that each
inputhas the value of the sport, so it can be sent to the server, and also the sport printed next to it, so the user can see it. - Back in our
registerfunction inapp.py, we can use another function to get the list of checked options.
- We’ll make sure that each
- We can also use radio buttons, which will allow only one option to be chosen at a time with
<input name="sport" type="radio" value="{{ sport }}"> {{ sport }}.
Storing data
- Let’s look at how we might store our registered students in a dictionary in the memory of our web server with
froshims3:# Implements a registration form, storing registrants in a dictionary, with error messages from flask import Flask, redirect, render_template, request app = Flask(__name__) REGISTRANTS = {} SPORTS = [ "Basketball", "Soccer", "Ultimate Frisbee" ] @app.route("/") def index(): return render_template("index.html", sports=SPORTS) @app.route("/register", methods=["POST"]) def register(): # Validate name name = request.form.get("name") if not name: return render_template("error.html", message="Missing name") # Validate sport sport = request.form.get("sport") if not sport: return render_template("error.html", message="Missing sport") if sport not in SPORTS: return render_template("error.html", message="Invalid sport") # Remember registrant REGISTRANTS[name] = sport # Confirm registration return redirect("/registrants") @app.route("/registrants") def registrants(): return render_template("registrants.html", registrants=REGISTRANTS)- We’ll create a dictionary called
REGISTRANTS, and inregisterwe’ll first check thenameandsport, returning a different error message in each case witherror.html. Then, we can store the name and sport in ourREGISTRANTSdictionary, and redirect to another route that will display registered students.
- We’ll create a dictionary called
- The error message template, meanwhile, will display the error message along with a fun image of a grumpy cat:
{% extends "layout.html" %} {% block body %} <h1>Error</h1> <p>{{ message }}</p> <img alt="Grumpy Cat" src="/static/cat.jpg"> {% endblock %} - Our
registrants.htmltemplate will print a table with the dictionary passed in as input:{% extends "layout.html" %} {% block body %} <h1>Registrants</h1> <table> <thead> <tr> <th>Name</th> <th>Sport</th> </tr> </thead> <tbody> {% for name in registrants %} <tr> <td>{{ name }}</td> <td>{{ registrants[name] }}</td> </tr> {% endfor %} </tbody> </table> {% endblock %}- Our table has a header row, and then a row for each key and value stored in
registrants.
- Our table has a header row, and then a row for each key and value stored in
- If our web server stops running, we’ll lose the data stored in memory, so we’ll use a SQLite database with the SQL library from
cs50infroshims4:# Implements a registration form, storing registrants in a SQLite database, with support for deregistration from cs50 import SQL from flask import Flask, redirect, render_template, request app = Flask(__name__) db = SQL("sqlite:///froshims.db") SPORTS = [ "Basketball", "Soccer", "Ultimate Frisbee" ] @app.route("/") def index(): return render_template("index.html", sports=SPORTS) ...- In our terminal, we can run
sqlite3 froshims.dbto open the database, and use the.schemacommand to see the table with columns ofid,name, andsport, which was created in advance:src9/froshims4/ $ sqlite3 froshims.db SQLite version 3.36.0 2021-06-18 18:36:39 Enter ".help" for usage hints. sqlite> .schema CREATE TABLE registrants (id INTEGER, name TEXT NOT NULL, sport TEXT NOT NULL, PRIMARY KEY(id));
- In our terminal, we can run
- Now, in our
/registerroute, we’re using SQL to store our data:@app.route("/register", methods=["POST"]) def register(): # Validate submission name = request.form.get("name") sport = request.form.get("sport") if not name or sport not in SPORTS: return render_template("failure.html") # Remember registrant db.execute("INSERT INTO registrants (name, sport) VALUES(?, ?)", name, sport) # Confirm registration return redirect("/registrants")- Once we’ve validated the request, we can use
INSERT INTOto add a row. - Flask also includes a function,
redirect, that we can use to redirect to another route.
- Once we’ve validated the request, we can use
- Similarly, for the
/registrantsroute, we canSELECTall rows and pass them to the template as a list of rows:@app.route("/registrants") def registrants(): registrants = db.execute("SELECT * FROM registrants") return render_template("registrants.html", registrants=registrants) - Our
registrants.htmltemplate will useregistrant["name"]andregistrant["sport"]to access the value of each key in each row:{% extends "layout.html" %} {% block body %} <h1>Registrants</h1> <table> <thead> <tr> <th>Name</th> <th>Sport</th> <th></th> </tr> </thead> <tbody> {% for registrant in registrants %} <tr> <td>{{ registrant["name"] }}</td> <td>{{ registrant["sport"] }}</td> <td> <form action="/deregister" method="post"> <input name="id" type="hidden" value="{{ registrant.id }}"> <input type="submit" value="Deregister"> </form> </td> </tr> {% endfor %} </tbody> </table> {% endblock %}- Our page will include another form for deregistering a person by an
id. When we click that button, we’ll see a request that just sends theidto our/deregisterroute.
- Our page will include another form for deregistering a person by an
- We’ll register a few people, and go back into our terminal to see that our database now has a few rows:
$ sqlite3 froshims.db SQLite version 3.36.0 2021-06-18 18:36:39 Enter ".help" for usage hints. sqlite> SELECT * FROM registrants; +----+--------+------------------+ | id | name | sport | +----+--------+------------------+ | 1 | David | Ultimate Frisbee | | 2 | Carter | Basketball | | 3 | Emma | Soccer | +----+--------+------------------+ - Our
/deregisterroute will take anidand delete that row from our database:@app.route("/deregister", methods=["POST"]) def deregister(): # Forget registrant id = request.form.get("id") if id: db.execute("DELETE FROM registrants WHERE id = ?", id) return redirect("/registrants") - A URL that uses GET can also be used to trick people, since they might click on them while logged in to a website, and perform some action unintentionally, known as a cross-site request forgery.
Emails
- We can even email users with another library,
flask_mail, infroshims5:# Implements a registration form, confirming registration via email import os import re from flask import Flask, render_template, request from flask_mail import Mail, Message app = Flask(__name__) # Requires that "Less secure app access" be on # https://support.google.com/accounts/answer/6010255 app.config["MAIL_DEFAULT_SENDER"] = os.environ["MAIL_DEFAULT_SENDER"] app.config["MAIL_PASSWORD"] = os.environ["MAIL_PASSWORD"] app.config["MAIL_PORT"] = 587 app.config["MAIL_SERVER"] = "smtp.gmail.com" app.config["MAIL_USE_TLS"] = True app.config["MAIL_USERNAME"] = os.environ["MAIL_USERNAME"] mail = Mail(app) ...- It turns out that we can provide configuration details like a username and password and mail server, in this case Gmail’s, to the
Mailvariable, which will send mail for us. - We set the sensitive variables outside of our source code, in VS Code’s environment, so we can avoid including them in our code.
- It turns out that we can provide configuration details like a username and password and mail server, in this case Gmail’s, to the
- In our
registerroute, we send an email to the user with themail.send()function from theflask_maillibrary:@app.route("/register", methods=["POST"]) def register(): # Validate submission name = request.form.get("name") email = request.form.get("email") sport = request.form.get("sport") if not name or not email or sport not in SPORTS: return render_template("failure.html") # Send email message = Message("You are registered!", recipients=[email]) mail.send(message) # Confirm registration return render_template("success.html") - To include the libraries we need, we’ll write a
requirements.txtfile with:Flask Flask-Mail - Now, if we restart our server and use the form to provide an email, we’ll see that we indeed get one sent to us (though it may end up in the Spam folder if we send too many to the same address)!
Sessions
- Sessions are how web servers remembers information about each user, which enables features like allowing users to stay logged in, and saving items to a shopping cart. These features require our server to be stateful, or having access to additional state, or information. HTTP on its own is stateless, since after we make a request and get a response, the interaction is completed.
- It turns out that servers can send another header in a response, called
Set-Cookie:HTTP/1.1 200 OK Content-Type: text/html Set-Cookie: session=value ...- Cookies are small pieces of data from a web server that the browser saves for us. In many cases, they are large random numbers or strings used to uniquely identify and track a user between visits.
- In this case, the server is asking our browser to set a cookie for that server, called
sessionto a value ofvalue.
- Then, when the browser makes another request to the same server, it’ll send back the same cookie that the same server has set before:
GET / HTTP/1.1 Host: gmail.com Cookie: session=value - In the real world, amusement parks might give you a hand stamp so you can come back inside after leaving. Similarly, our browser is presenting our cookies back to the web server, so it can remember who we are.
- In Flask, we can use the
flask_sessionlibrary to help manage this for us, in a new app calledlogin:from flask import Flask, redirect, render_template, request, session from flask_session import Session # Configure app app = Flask(__name__) # Configure session app.config["SESSION_PERMANENT"] = False app.config["SESSION_TYPE"] = "filesystem" Session(app)- We’ll configure the session library to use the server’s filesystem, and use
sessionlike a dictionary to store a user’s name. It turns out that Flask will use HTTP cookies for us, to maintain thissessionvariable for each user visiting our web server. Every user will be logged in with a different session, and we can see them in theflask_sessiondirectory:src9/login/flask_session/ $ ls 2029240f6d1128be89ddc32729463129
- We’ll configure the session library to use the server’s filesystem, and use
- We’ll visit our server’s URL, and get redirected to the
/loginroute automatically. We see a form that we can fill in, and then redirected back to the index route,/, with “You are logged in as David.” Then, we can reload the page, or open it again in a new tab, and see the same message. We can also use the “Log out” link to log out. - For our default
/route, we’ll redirect to/loginif there’s no name set insessionfor the user yet, and otherwise show a defaultindex.htmltemplate.@app.route("/") def index(): if not session.get("name"): return redirect("/login") return render_template("index.html") - In our
index.html, we can check ifsession["name"]exists, and show different content if so:{% extends "layout.html" %} {% block body %} {% if session["name"] %} You are logged in as {{ session["name"] }}. <a href="/logout">Log out</a>. {% else %} You are not logged in. <a href="/login">Log in</a>. {% endif %} {% endblock %} - For our
/loginroute, we’ll storenameinsessionto the form’s value sent via POST, and then redirect to the default route. If we visited the route via GET, we’ll render the login form atlogin.html:@app.route("/login", methods=["GET", "POST"]) def login(): if request.method == "POST": session["name"] = request.form.get("name") return redirect("/") return render_template("login.html")- Then, in our
login.html, we can have a form that can submit to itself:{% extends "layout.html" %} {% block body %} <form action="/login" method="post"> <input autocomplete="off" autofocus name="name" placeholder="Name" type="text"> <input type="submit" value="Log In"> </form> {% endblock %}
- Then, in our
- For the
/logoutroute, we can clear the value fornameinsessionby setting it toNone, and redirect to/again:@app.route("/logout") def logout(): session["name"] = None return redirect("/")
store, shows
- We’ll look through another example,
store. When we run our server and visit our site’s URL, we see a list of books we can add to a virtual shopping cart. - In the template
books.html, we see another loop for each book:{% extends "layout.html" %} {% block body %} <h1>Books</h1> {% for book in books %} <h2>{{ book["title"] }}</h2> <form action="/cart" method="post"> <input name="id" type="hidden" value="{{ book['id'] }}"> <input type="submit" value="Add to Cart"> </form> {% endfor %} {% endblock %}- Notice that each
<form>includes a hidden value ofbook['id']. When the button “Add to Cart” is clicked, that ID is sent back to the server.
- Notice that each
- In
app.py, we see that there’s a database used to get the list of books:... # Connect to database db = SQL("sqlite:///store.db") ... @app.route("/") def index(): books = db.execute("SELECT * FROM books") return render_template("books.html", books=books) ... - As before, we can open the database to see its schema and data:
src9/store/ $ sqlite3 store.db .SQLite version 3.36.0 2021-06-18 18:36:39 Enter ".help" for usage hints. sqlite> .schema CREATE TABLE books (id INTEGER, title TEXT NOT NULL, PRIMARY KEY(id)); sqlite> SELECT * FROM books; +----+-------------------------------------------+ | id | title | +----+-------------------------------------------+ | 1 | Harry Potter and the Sorcerer's Stone | | 2 | Harry Potter and the Chamber of Secrets | | 3 | Harry Potter and the Prisoner of Azkaban | | 4 | Harry Potter and the Goblet of Fire | | 5 | Harry Potter and the Order of the Phoenix | | 6 | Harry Potter and the Half-Blood Prince | | 7 | Harry Potter and the Deathly Hallows | +----+-------------------------------------------+ - In the
/cartroute, we’ll create a cart for the session automatically, and add values to it:@app.route("/cart", methods=["GET", "POST"]) def cart(): # Ensure cart exists if "cart" not in session: session["cart"] = [] # POST if request.method == "POST": id = request.form.get("id") if id: session["cart"].append(id) return redirect("/cart") # GET books = db.execute("SELECT * FROM books WHERE id IN (?)", session["cart"]) return render_template("cart.html", books=books)- Our route can accept either a form input via POST, or a request via POST to shows the contents of the cart. We can add this check with
if request.method == "POST":. - When we receive a form input, we can add it to our list of IDs in memory with
session["cart"].append(id). - When we receive a GET request, we can pass that list of IDs to our database to retrieve the names of the books.
- Our route can accept either a form input via POST, or a request via POST to shows the contents of the cart. We can add this check with
Searching
- Let’s look at another example,
shows0. - When we run our server and visit the page, we see a search form that allows us to search for titles of TV shows. Our URL changes to
/search?q=cats. - In
app.py, we start by opening a database,shows.db:# Searches for shows from cs50 import SQL from flask import Flask, render_template, request app = Flask(__name__) db = SQL("sqlite:///shows.db") @app.route("/") def index(): return render_template("index.html") @app.route("/search") def search(): shows = db.execute("SELECT * FROM shows WHERE title LIKE ?", "%" + request.args.get("q") + "%") return render_template("search.html", shows=shows)- The default
/route will show a form, where we can type in some search term. - The form will use the GET method to send the search query to
/search, which in turn will use SQL to find a list of shows that match. - Finally, the
search.htmltemplate will use a loop to print the list of show titles:{% extends "layout.html" %} {% block body %} <ul> {% for show in shows %} <li>{{ show["title"] }}</li> {% endfor %} </ul> {% endblock %}
- The default
- With JavaScript in shows1, we can show a partial list of results as we type.
- If we look at the source code of our page, we see that there’s JavaScript that sets the HTML of an empty
<ul>.<!DOCTYPE html> <html lang="en"> <head> <meta name="viewport" content="initial-scale=1, width=device-width"> <title>shows</title> </head> <body> <input autocomplete="off" autofocus placeholder="Query" type="search"> <ul></ul> <script> let input = document.querySelector('input'); input.addEventListener('input', async function() { let response = await fetch('/search?q=' + input.value); let shows = await response.text(); document.querySelector('ul').innerHTML = shows; }); </script> </body> </html>- In our JavaScript code, we start by selecting the input box. Then, every time the input changes, we use a function called
fetchto get more data from the server without changing the URL of the current page. Here, we’re using the/searchroute. - Then, we store the text of the response in a variable called
shows, and then using that in our HTML. - We can use the Network tab in Developer Tools again, to see that the response of the
/searchroute is a list of<li>elements. - We can even visit
/search?q=cmanually to see the same response in our browser:<li>Catweazle</li> <li>Ace of Wands</li> <li>The Adventures of Don Quick</li> <li>Albert and Victoria</li> <li>All My Children</li> ...
- In our JavaScript code, we start by selecting the input box. Then, every time the input changes, we use a function called
- It turns out that we can use another format for our data, JSON, JavaScript Object Notation in
shows2, instead of returning a long list of<li>elements that are already created. Now, when we run this version and visit the same URL, we see:[{"id":63881,"title":"Catweazle"},{"id":65269,"title":"Ace of Wands"},{"id":65270,"title":"The Adventures of Don Quick"},{"id":65271,"title":"Albert and Victoria"},{"id":65272,"title":"All My Children"},...- We see a more efficient notation, that includes the raw data of an
idandtitlefor each show.
- We see a more efficient notation, that includes the raw data of an
- Then, in the source code of our
index.html, we’ll use JavaScript to add those shows to our page programmatically:<!DOCTYPE html> <html lang="en"> <head> <meta name="viewport" content="initial-scale=1, width=device-width"> <title>shows</title> </head> <body> <input autocomplete="off" autofocus placeholder="Query" type="text"> <ul></ul> <script> let input = document.querySelector('input'); input.addEventListener('input', async function() { let response = await fetch('/search?q=' + input.value); let shows = await response.json(); let html = ''; for (let id in shows) { let title = shows[id].title.replace('<', '<').replace('&', '&'); html += '<li>' + title + '</li>'; } document.querySelector('ul').innerHTML = html; }); </script> </body> </html>- With
response.json(), we turn the raw response into a list of dictionaries, and then we can build a string of HTML with theforloop.
- With
- So, in this web application, HTML is used to for the view itself, Python is used to write the code on our server that sends back data, and JavaScript is used to make the page interactive and dynamic.