Lecture 8
The internet
- Today we’ll take a look at web programming, using a set of new languages and technologies to create graphical and visual applications for the internet.
- The internet is the network of networks of computers communicating with one another, which provides the infrastructure to send zeros and ones. On top of that foundation, we can build applications that send and receive data.
- Routers are specialized computers, with CPUs and memory, whose purpose is to relay data across cables or wireless technologies, between other devices on the internet.
- Protocols are a set of standard conventions, like a physical handshake, that the world has agreed upon for computers to communicate with. For example, there are certain patterns of zeros and ones, or messages, a computer has to use to tell a router where it wants to send data.
- TCP/IP are two protocols for sending data between two computers. In the real world, we might write an address on an envelope in order to send a letter to someone, along with our own address for a letter in return. The digital version of an envelope, or a message with from and to addresses, is called a packet.
- IP stands for internet protocol, a protocol supported by modern computers’ software, which includes a standard way for computers to address each other. IP addresses are unique addresses for computers connected to the internet, such that a packet sent from one computer to another will be passed along routers until it reaches its destination.
- Routers have, in their memory, a table mapping IP addresses to cables each connected to other routers, so they know where to forward packets to. It turns out that there are protocols for routers to communicate and figure out these paths as well.
- DNS, domain name system, is another technology that translates domain names like cs50.harvard.edu to IP addresses. DNS is generally provided as a service by the nearest internet service provider, or ISP.
- Finally, TCP, transmission control protocol, is one final protocol that allows a single server, at the same IP address, to provide multiple services through the use of a port number, a small integer added to the IP address. For example, HTTP, HTTPS, email, and even Zoom has their own port numbers for those programs to use to communicate over the network.
- TCP also provides a mechanism for resending packets if a packet is somehow lost and not received. It turns out that, on the internet, there are multiple paths for a packet to be sent since there are lots of routers that are interconnected. So a web browser, making a request for a cat, might see its packet sent through one path of routers, and the responding server might see its response packets sent through another.
- A large amount of data, such as a picture, will be broken into smaller chunks so that the packets are all of a similar size. This way, routers along the internet can send everyone’s packets along more fairly and easily. Net neutrality refers to the idea that these public routers treat packets equally, as opposed to allowing packets from certain companies or of certain types to be prioritized.
- When there are multiple packets for a single response, TCP will also specify that each of them be labeled, as with “1 of 2” or “2 of 2”, so they can be combined or re-sent as needed.
- With all of these technologies and protocols, we’re able to send data from one computer to another, and can abstract the internet away, to build applications on top.
Web development
- The web is one application running on top of the internet, allowing us to get web pages. Other applications like Zoom provide video conferencing, and email is another application as well.
- HTTP, or Hypertext Transfer Protocol, governs how web browsers and web servers communicate within TCP/IP packets.
- Two commands supported by HTTP include GET and POST. GET allows a browser to ask for a page or file, and POST allows a browser to send data to the server.
- A URL, or web address, might look like
https://www.example.com/.httpsis the protocol being used, and in this case HTTPS is the secure version of HTTP, ensuring that the contents of packets between the browser and server are encrypted.example.comis the domain name, where.comis the top-level domain, conventionally indicating the “type” of website, like a commercial website for.com, or an organization for.org. Now there are hundreds of top-level domains, and they vary in restrictions on who can use them, but many of them allow anyone to register for a domain.wwwis the hostname that, by convention, indicates to us that this is a “world wide web” service. It’s not required, so today many websites aren’t configured to include it.- Finally, the
/at the end is a request for the default file, likeindex.html, that the web server will respond with.
- An HTTP request will start with:
GET / HTTP/1.1 Host: www.example.com ...- The
GETindicates that the request is for some file, and/indicates the default file. A request could be more specific, and start withGET /index.html. - There are different versions of the HTTP protocol, so
HTTP/1.1indicates that the browser is using version 1.1. Host: www.example.comindicates that the request is forwww.example.com, since the same web server might be hosting multiple websites and domains.
- The
- A response will start with:
HTTP/1.1 200 OK Content-Type: text/html ...- The web server will respond with the version of HTTP, followed by a status code, which is
200 OKhere, indicating that the request was valid. - Then, the web server indicates the type of content in its response, which might be text, image, or other format.
- Finally, the rest of the packet or packets will include the content.
- The web server will respond with the version of HTTP, followed by a status code, which is
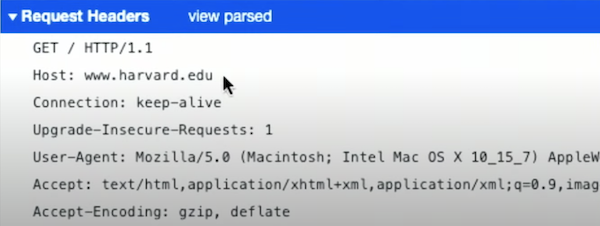
- We can see a redirect in a browser by typing in a URL, like
http://www.harvard.edu, and looking at the address bar after the page has loaded, which will showhttps://www.harvard.edu. Browsers include developer tools, which allow us to see what’s happening. In Chrome’s menu, for example, we can go to View > Developer > Developer Tools, which will open a panel on the screen. In the Network tab, we can see that there were many requests, for text, images, and other pieces of data that were downloaded separately for the single web pages. - The first request actually returned a status code of
301 Moved Permanently, redirecting our browser fromhttp://...tohttps://...:

- The request and response also includes a number of headers, or additional data:
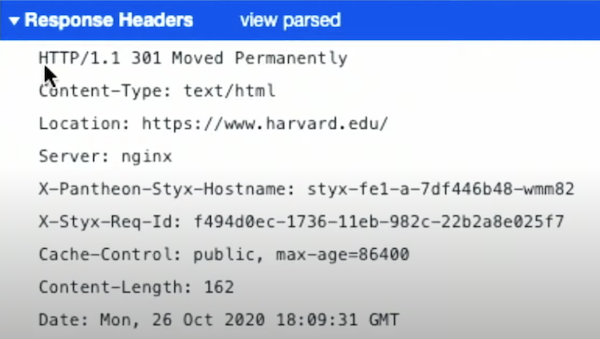
- Note that the response includes a
Location:header for the browser to redirect us to.
- Note that the response includes a
- Other HTTP status codes include:
200 OK301 Moved Permanently304 Not Modified- This allows the browser to use its cache, or local copy, of some resource like an image, instead of having the server send it back again.
307 Temporary Redirect401 Unauthorized403 Forbidden404 Not Found418 I'm a Teapot500 Internal Server Error- Buggy code on a server might result in this status code.
503 Service Unavailable- …
- We can use a command-line tool,
curl, to connect to a URL. We can run:curl -I http://safetyschool.org HTTP/1.1 301 Moved Permanently Server: Sun-ONE-Web-Server/6.1 Date: Wed, 26 Oct 2020 18:17:05 GMT Content-length: 122 Content-type: text/html Location: http://www.yale.edu Connection: close- It turns out that
safetyschool.orgredirects toyale.edu! - And
harvardsucks.orgis a website with another prank on Harvard!
- It turns out that
- Finally, an HTTP request can include inputs to servers, like the string
q=catsafter the?:GET /search?q=cats HTTP/1.1 Host: www.google.com ...- This uses a standard format for passing input, like command-line arguments, to web servers.
HTML
- Now that we can use the internet and HTTP to send and receive messages, it’s time to see what’s in the content for web pages. HTML, Hypertext Markup Language, is not a programming language, but rather used to format web pages and tell the browser how to display pages, using tags and attributes.
- A simple page in HTML might look like this:
<!DOCTYPE html> <html lang="en"> <head> <title> hello, title </title> </head> <body> hello, body </body> </html>- The first line is a declaration that the page follows the HTML standard.
- Next is a tag, a word in brackets like
<html>and</html>. The first is a start or open tag, and the second is a close tag. In this case, the tags indicate the start and end of the HTML page. The start tag here has an attribute as well,lang="en"which specifies that the language of the page will be in English, to help the browser translate the page if needed. - Within the
<html>tag are two more tags,<head>and<body>, which are both like children nodes in a tree. And within<head>is the<title>tag, the contents of which we see in a tab or window’s title in a browser. Within<body>is the contents of the page itself, which we’ll see in the main view of a browser as well.
- The page above will be loaded into the browser as a data structure, like this tree:
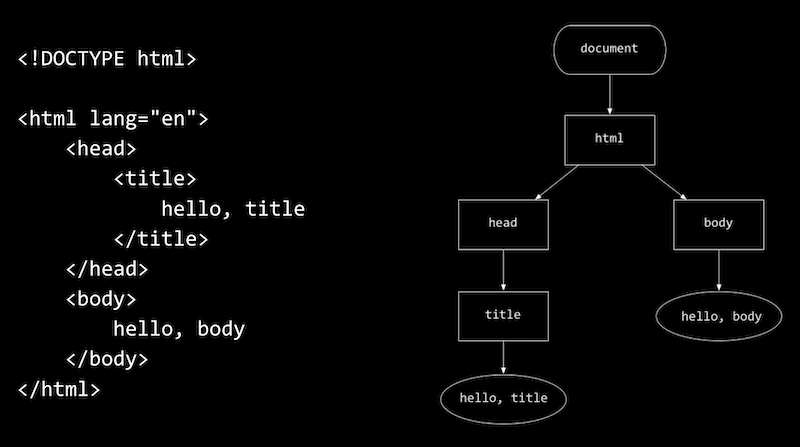
- Note that there is a hierarchy mapping each tag and its children. Rectangular nodes are tags, while oval ones are text.
- We can save the code above as an HTML on our local computers, which would work in a browser, but just for us. With the CS50 IDE, we can create an HTML file, and actually make it available over the internet.
- We’ll create
hello.htmlwith the code above, and start a web server installed on the CS50 IDE withhttp-server, a program that will listen for HTTP requests and respond with pages or other content. - The CS50 IDE itself is already running on some web server, using ports 80 and 443, so our own web server within the IDE will have to use a different port,
8080by default. We’ll see a long URL, ending incs50.ws, and if we open that URL we’ll see a listing of files, includinghello.html. - Back in the terminal of our IDE, we’ll see new rows of text printed by our web server, a log of requests that it’s getting.
- We’ll take a look at
paragraphs.html.- With the
<p>tag, we can indicate that each section of text should be a paragraph. - After we save this file, we’ll need to refresh the index in the web browser, and then open
paragraphs.html.
- With the
- We can add headings with tags that start with
h, and have levels of1through6inheadings.html. - We take a look at
list.html,table.html, andimage.htmlas well, to add lists, tables, and images.- We can use the
<ul>tag to create an unordered list, like bullet points, and<ol>for an ordered list with numbers. - Tables start with a
<table>tag and have<tr>tags as rows, and<td>tags for individual cells. - For
image.html, we can upload an image to the CS50 IDE, to include it in our page, as well as use thealtattribute to add alternative text for accessibility.
- We can use the
- By looking for documentation or other online resources, we can learn the tags that exist in HTML, and how to use them.
- We can create links in
link.htmlwith the<a>, or anchor, tag. Thehrefattribute is for a hypertext reference, or simply where the link should take us, and within the tag is the text that should appear as the link.- We could set the
hreftohttps://www.yale.edu, but leaveHarvardwithin the tag, which might prank users or even trick them into visiting a fake version of some website. Phishing is an act of tricking users, a form of social engineering that includes misleading links.
- We could set the
- In
search.html, we can create a more complex form that takes user input and sends it to Google’s search engine:<!DOCTYPE html> <html lang="en"> <head> <title>search</title> </head> <body> <form action="https://www.google.com/search" method="get"> <input name="q" type="search"> <input type="submit" value="Search"> </form> </body> </html>- First, we have a
<form>tag that has anactionof Google’s search URL, with a method of GET. - Inside the form, we have one
<input>, with the nameq, and another<input>with the type ofsubmit. When the second input, a button, is clicked, the form will append the text in the first input to the action URL, ending it withsearch?q=.... - So when we open
search.htmlin our browser, we can use the form to search via Google. - A form can also use a POST method, which doesn’t include the form’s data in the URL, but elsewhere in the request.
- First, we have a
CSS
- We can improve the aesthetics of our pages with CSS, Cascading Style Sheets, another language that tells our browser how to display tags on a page. CSS uses properties, or key-value pairs, like
color: red;to tags with selectors. - In HTML, we have some options for including CSS. We can add a
<style>tag within the<head>tag, with styles direcly inside, or we can link to astyles.cssfile with a<link>tag within the<head>tag. - We can also include CSS directly in each tag:
<!DOCTYPE html> <html lang="en"> <head> <title>css</title> </head> <body> <header style="font-size: large; text-align: center;"> John Harvard </header> <main style="font-size: medium; text-align: center;"> Welcome to my home page! </main> <footer style="font-size: small; text-align: center;"> Copyright © John Harvard </footer> </body> </html><header>,<main>, and<footer>tags are like<p>tags, indicating the sections that the text on our page are in.- For each tag, we can add a
styleattribute, with the value being a list of CSS key-value properties, separated by semicolons. Here, we’re setting thefont-sizefor each tag, and aligning the text in the center. - Note that we can use
©, an HTML entity, as a code to include some symbol in our web page.
- We can align all the text at once:
<!DOCTYPE html> <html lang="en"> <head> <title>css</title> </head> <body style="text-align: center;"> <header style="font-size: large;"> John Harvard </header> <main style="font-size: medium;"> Welcome to my home page! </main> <footer style="font-size: small;"> Copyright © John Harvard </footer> </body> </html>- Here, the style applied to the
<body>tag cascades, or applies, to its children, so all the sections inside will have centered text as well.
- Here, the style applied to the
- To factor out, or separate our CSS from HTML, we can include styles in the
<head>tag:<!DOCTYPE html> <html lang="en"> <head> <style> header { font-size: large; text-align: center; } main { font-size: medium; text-align: center; } footer { font-size: small; text-align: center; } </style> <title>css</title> </head> <body> <header> John Harvard </header> <main> Welcome to my home page! </main> <footer> Copyright © John Harvard </footer> </body> </html>- For each type of tag, we’ve used a CSS type selector to style it.
- We can also use a more specific class selector:
<!DOCTYPE html> <html lang="en"> <head> <style> .centered { text-align: center; } .large { font-size: large; } .medium { font-size: medium; } .small { font-size: small; } </style> <title>css</title> </head> <body> <header class="centered large"> John Harvard </header> <main class="centered medium"> Welcome to my home page! </main> <footer class="centered small"> Copyright © John Harvard </footer> </body> </html>- We can define our own CSS class with a
.followed by a keyword we choose, so here we’ve created.large,.medium, and.small, each with some property for the font size. - Then, on any number of tags in our page’s HTML, we can add one or more of these classes with
class="centered large", reusing these styles. - We can remove the redundancy for
centered, and apply it to just the<body>tag as well.
- We can define our own CSS class with a
- Finally, we can take all of the CSS for the properties and move them to another file with the
<link>tag:<!DOCTYPE html> <html lang="en"> <head> <link href="styles.css" rel="stylesheet"> <title>css</title> </head> <body> <header class="centered large"> John Harvard </header> <main class="centered medium"> Welcome to my home page! </main> <footer class="centered small"> Copyright © John Harvard </footer> </body> </html>- Now, one person can work on the HTML and another can work on the CSS, more independently.
- With CSS, we’ll also rely on references and other resources to look up how to use properties as we need them.
- We can use pseudoselectors, which selects certain states:
<!DOCTYPE html> <html lang="en"> <head> <style> #harvard { color: #ff0000; } #yale { color: #0000ff; } a { text-decoration: none; } a:hover { text-decoration: underline; } </style> <title>link</title> </head> <body> Visit <a href="https://www.harvard.edu/" id="harvard" >Harvard</a> or <a href="https://www.yale.edu/" id="yale" >Yale</a>. </body> </html>- Here, we’re using
a:hoverto set properties on<a>tags when the user hovers over them. - We also have an
idattribute on each<a>tag, to set different colors on each with ID selectors that start with a#in CSS.
- Here, we’re using
JavaScript
- To write code that can run in users’ browsers, or on the client, we’ll use a new language, JavaScript.
- The syntax of JavaScript is similar to that of C and Python for basic constructs:
let counter = 0;counter = counter + 1; counter += 1; counter++;if (x < y) { }if (x < y) { } else { }if (x < y) { } else if (x > y) { } else { }while (true) { }for (let i = 0; i < 3; i++) { }- Notice that JavaScript is loosely typed as well, with
letbeing the keyword to declare variables of any type.
- Notice that JavaScript is loosely typed as well, with
- With JavaScript, we can change the HTML in the browser in real-time. We can use
<script>tags to include our code directly, or from a.jsfile. - We’ll create another form:
<!DOCTYPE html> <html lang="en"> <head> <script> function greet() { alert('hello, body'); } </script> <title>hello</title> </head> <body> <form onsubmit="greet(); return false;"> <input id="name" type="text"> <input type="submit"> </form> </body> </html>- Here, we won’t add an
actionto our form, since this will stay on the same page. Instead, we’ll have anonsubmitattribute that will call a function we’ve defined in JavaScript, and usereturn false;to prevent the form from actually being submitted anywhere. - Now, if we load that page, we’ll see
hello, bodybeing shown when we submit the form.
- Here, we won’t add an
- Since our input tag, or element, has an ID of
name, we can use it in our script:<script> function greet() { let name = document.querySelector('#name').value; alert('hello, ' + name); } </script>documentis a global variable that comes with JavaScript in the browser, andquerySelectoris another function we can use to select a node in the DOM, Document Object Model, or the tree structure of the HTML page. After we select the element with the IDname, we get thevalueinside the input, and add it to our alert.- Note that JavaScript uses single quotes for strings by convention, though double quotes can be used as well as long as they match for each string.
- We can add more attributes to our form, to change placeholder text, change the button’s text, disable autocomplete, or autofocus the input:
<form> <input autocomplete="off" autofocus id="name" placeholder="Name" type="text"> <input type="submit"> </form> - We can also listen to events in JavaScript, which occur when something happens on the page. For example, we can listen to the
submitevent on our form, and call thegreetfunction:<script> function greet() { let name = document.querySelector('#name').value; alert('hello, ' + name); } function listen() { document.querySelector('form').addEventListener('submit', greet); } document.addEventListener('DOMContentLoaded', listen); </script>- Here, in
listenwe pass the functiongreetby name, and not call it yet. The event listener will call it for us when the event happens. - We need to first listen to the
DOMContentLoadedevent, since the browser reads our HTML file from top to bottom, andformwouldn’t exist until it’s read the entire file and loaded the content. So by listening to this event, and calling ourlistenfunction, we knowformwill exist.
- Here, in
- We can also use anonymous functions in JavaScript:
<script> document.addEventListener('DOMContentLoaded', function() { document.querySelector('form').addEventListener('submit', function() { let name = document.querySelector('#name').value; alert('hello, ' + name); }); }); </script>- We can pass in a lambda function with the
function()syntax, so here we’ve passed in both listeneres directly toaddEventListener.
- We can pass in a lambda function with the
- In addition to
submit, there are many other events we can listen to:blurchangeclickdragfocuskeyuploadmousedownmouseovermouseupsubmittouchmoveunload...
- For example, we can listen to the
keyupevent, and change the DOM as soon as we release a key:<!DOCTYPE html> <html lang="en"> <head> <script> document.addEventListener('DOMContentLoaded', function() { let input = document.querySelector('input'); input.addEventListener('keyup', function(event) { let name = document.querySelector('#name'); if (input.value) { name.innerHTML = `hello, ${input.value}`; } else { name.innerHTML = 'hello, whoever you are'; } }); }); </script> <title>hello</title> </head> <body> <form> <input autocomplete="off" autofocus placeholder="Name" type="text"> </form> <p id="name"></p> </body> </html>- Notice that we can substitute strings in JavaScript as well, with the
${input.value}inside a string surrounded by backticks,`.
- Notice that we can substitute strings in JavaScript as well, with the
- We can programmatically change style, too:
<!DOCTYPE html> <html lang="en"> <head> <title>background</title> </head> <body> <button id="red">R</button> <button id="green">G</button> <button id="blue">B</button> <script> let body = document.querySelector('body'); document.querySelector('#red').onclick = function() { body.style.backgroundColor = 'red'; }; document.querySelector('#green').onclick = function() { body.style.backgroundColor = 'green'; }; document.querySelector('#blue').onclick = function() { body.style.backgroundColor = 'blue'; }; </script> </body> </html>- After selecting an element, we can use the
styleproperty to set values for CSS properties as well. Here, we have three buttons, each of which has anonclicklistener that changes the background color of the<body>element. - Notice here that our
<script>tag is at the end of our HTML file, so we don’t need to listen to theDOMContentLoadedevent, since the rest of the DOM will already have been read by the browser.
- After selecting an element, we can use the
- In a browser’s developer tools, too, we can see the DOM and any styles applied via the
Elementstab:

- We can even use this to change a page in our browser after it’s loaded, by clicking on some element and editing the HTML. But these changes will only be made in our browser, not in our original HTML file or on some web page elsewhere.
- In
size.html, we can set the font size with a dropdown via JavaScript, and inblink.htmlwe can make an element “blink”, alternating between visible and hidden. - With
geolocation.html, we can ask the browser for a user’s GPS coordinates, and withautocomplete.html, we can autocomplete something we typed in, with words from a dictionary file. - Finally, we can use Python to write code that connect to other devices on a local network, like a light bulb, via an API, application programming interface. Our light bulb’s API in particular accepts request at certain URLs:
import os import requests USERNAME = os.getenv("USERNAME") IP = os.getenv("IP") URL = f"http://{IP}/api/{USERNAME}/lights/1/state" requests.put(URL, json={"on": False})- With this code, we can use the PUT method to send a message to our light bulb, turning it off.
- We use environment variables, values stored elsewhere on our computer, for our username and IP address.
- Now, with a little more logic, we can make our light bulb blink:
import os import requests import time USERNAME = os.getenv("USERNAME") IP = os.getenv("IP") URL = f"http://{IP}/api/{USERNAME}/lights/1/state" while True: requests.put(URL, json={"bri": 254, "on": True}) time.sleep(1) requests.put(URL, json={"on": False}) time.sleep(1) - We’ll put together HTML, CSS, JavaScript, Python, and SQL next time!