Lecture 8
The internet
- Today we’ll take a look at web programming, using a set of new languages and technologies to build applications that are both server-side, running on servers or cloud services, and client-side, running on the user’s own devices.
- The internet is the network of networks of computers, or servers, communicating with one another by sending and receiving data.
- The original “internet” was established in 1969, called ARPANET, which connected computers between various institutions.
- Today, many more cables and server hardware connects all the computers on the internet.
- Routers are specialized computers, with CPUs and memory, that routes, or relays, data from one point to another. At home or on campus, for example, we might have routers that accepts data and sends them out.
- We take a look at a video where staff members “send” an envelope across the screen of a Zoom meeting.
- A router might have multiple options for what direction to send some data, and there are algorithms that try to figure out that direction.
- Protocols are a set of rules or conventions, like a physical handshake for humans , that the world has agreed upon for computers to communicate with.
- TCP/IP are two protocols for sending data between two computers. In the real world, we might write an address on an envelope in order to send a letter to someone, along with our own address for a letter in return.
- IP stands for internet protocol, a protocol that includes a standard way for computers to address each other. IP addresses are unique addresses for computers connected to the internet, such that a packet sent from one computer to another will be passed along routers until it reaches its destination.
- An IP address might have the format
#.#.#.#, where each number can have a value from 0 to 255. Each number will be the size of one byte, so the entire address will be 4 bytes, or 32 bits. This means that this version of IP, version 4, can only support a maximum of 4 billion addresses. Another version of IP, version 6, uses 128 bits to support many more possible addresses.
- An IP address might have the format
- TCP, transmission control protocol, is a protocol for sending and receing data. TCP allows for a single server, at the same IP address, to provide multiple services through the use of a port number, a small integer added to the IP address. For example, HTTP is sent to port number 80, and HTTPS uses port number 443.
- TCP also allows for a large amount of data, like an image, to be sent in smaller chunks. Each of them might be labeled with a sequence number, as with “part 1 of 4” or “part 2 of 4”. And if one of the parts is lost, the recipient can ask for the missing part again.
- UDP is another protocol for sending data that does not guarantee delivery like TCP, which might be useful for streaming real-time videos or calls, since we don’t want to wait for all the packets to be redelivered before we get new ones.
- DNS, domain name system, is another technology that translates domain names like cs50.harvard.edu to IP addresses. DNS is generally provided by a server nearby, with a big table in its memory, of domain names and IP addresses.
The web
- The internet, with routers, IP, TCP, and DNS, is like the plumbing that allows us to send data from one computer to another. The web is one application that is built on top of the internet.
- HTTP, or Hypertext Transfer Protocol, standardizes how web browsers and web servers communicate within TCP/IP packets.
- HTTPS is the secure version of HTTP, ensuring that the contents of packets between the browser and server are encrypted.
- A URL, or web address, might look like
https://www.example.com/.https://is the protocol being used.- The
/at the end is a request for the default file. It might also end in something like/file.htmlfor a specific file. example.comis the domain name..comis a top-level domain name, and others like.eduor.ioindicate what type of website might be hosted there. Today, there are hundreds of top-level domain names, some with restrictions on how they can be used.wwwis the hostname, or subdomain, that refers to one or more specific servers in the domain name. A domain name might include web servers forwww, or email servers formail, so each subdomain can point to them separately.- Together,
www.example.comis a fully qualified domain name, or one that has a specific set of addresses.
- Two commands supported by HTTP include GET and POST. GET allows a browser to ask for a page or file in a URL, and POST allows a browser to send additional data to the server that is hidden from the URL. Both of these are requests we can make to a server, which will provide a response in return.
- A GET request will start with:
GET / HTTP/1.1 Host: www.example.com ...- The
GETindicates that the request is for some file, and/indicates the default file. - There are different versions of the HTTP protocol, so
HTTP/1.1indicates that the browser is using version 1.1. Host: www.example.comindicates that the request is forwww.example.com, since the same web server might be hosting multiple websites and domains.
- The
- A response for a successful request will start with:
HTTP/1.1 200 OK Content-Type: text/html ...- The web server will respond with the version of HTTP, followed by a status code, which is
200 OKhere, indicating that the request was valid. - Then, the web server indicates the type of content in its response, which might be text, image, or other format.
- Finally, the rest of the packet or packets will include the content.
- The web server will respond with the version of HTTP, followed by a status code, which is
- The keys and values, like
Host: www.example.comandContent-Type: text/html, are known as HTTP headers. - We’ll type in
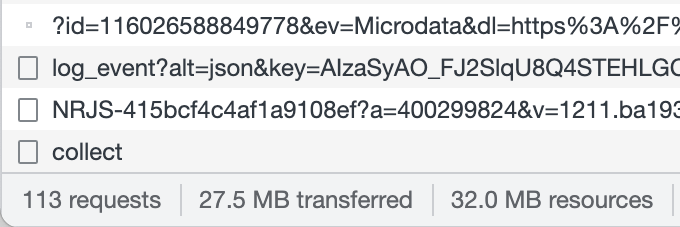
http://harvard.eduin our browser, and see that the address bar has changed tohttps://www.harvard.eduafter the page has loaded. Browsers include developer tools, which allow us to see what’s happening. In Chrome’s menu, for example, we can go to View > Developer > Developer Tools, which will open a panel on the screen. We’ll also use an Incognito window, so Chrome doesn’t remember our previous requests. - In the Network tab, we can see that there were over a hundred requests, for text, images, and other pieces of data that were downloaded separately for a single web page. It turns out that our browser made a single request, and the response from the server indicated that we needed to make all those other requests to download the other data on the page:
- If we scroll up in the lists of requests, we can see the request headers for the first request by clicking on the one for
harvard.edu:
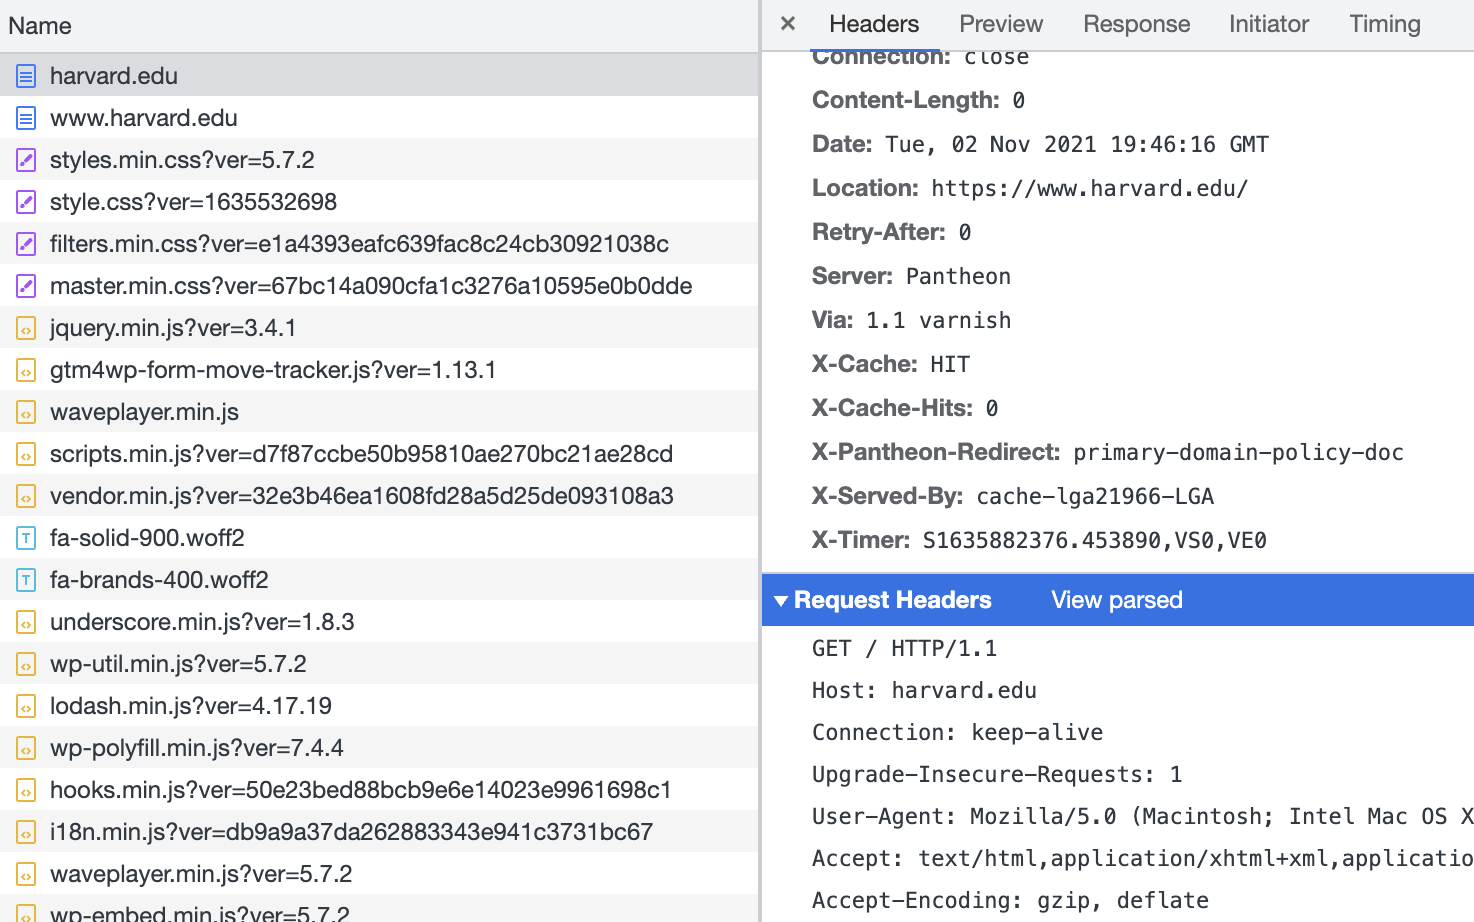
- And we can scroll to see that the server’s response actually returned a status code of
301 Moved Permanently, redirecting our browser fromhttp://...tohttps://...:

- Note that the response includes a
Location:header for the browser to redirect us to.
- Note that the response includes a
- In VS Code’s terminal, we can use a command-line tool,
curl, to see the response headers for a request as well:$ curl -I -X GET http://harvard.edu/ HTTP/1.1 301 Moved Permanently Retry-After: 0 Content-Length: 0 Server: Pantheon Location: https://www.harvard.edu/ ... - If we visit the new location with
curl, we see a status code of200, as well as a new version of HTTP that we can use:$ curl -I -X GET https://www.harvard.edu/ HTTP/2 200 cache-control: public, max-age=1200 content-type: text/html; charset=UTF-8 - And if we try to visit a URL that doesn’t exist, we’ll see an HTTP status code of
404:$ curl -I -X GET https://www.harvard.edu/thisfiledoesnotexist HTTP/2 404 cache-control: no-cache, must-revalidate, max-age=0 content-type: text/html; charset=UTF-8 - Other HTTP status codes include:
200 OK301 Moved Permanently302 Found304 Not Modified307 Temporary Redirect401 Unauthorized403 Forbidden404 Not Found418 I'm a Teapot- An April Fool’s joke years ago
500 Internal Server Error- Buggy code on a server might result in this status code, like segfaults we might have seen in C.
503 Service Unavailable- …
- It turns out that
safetyschool.orgredirects toyale.edu! Someone must have purchased the domain name and set it to redirect:$ curl -I -X GET http://safetyschool.org HTTP/1.1 301 Moved Permanently Server: Sun-ONE-Web-Server/6.1 Date: Tue, 02 Nov 2021 19:59:18 GMT Content-length: 122 Content-type: text/html Location: http://www.yale.edu Connection: close - And
harvardsucks.orgused to be a website with a video of a prank on Harvard.
HTML
- Now that we can use the internet and HTTP to send and receive messages, it’s time to see what’s in the content for web pages. HTML, Hypertext Markup Language, is not a programming language, but rather used to format web pages and tell the browser how to display them.
- A simple page in HTML might look like this:
<!DOCTYPE html> <html lang="en"> <head> <title> hello, title </title> </head> <body> hello, body </body> </html> - Since this page is saved in our instance of VS Code, in the cloud, we can also run our own web server with the
http-servercommand, and clicking “Open in Browser” in the notification that appears.- This web server will listen on port 8080 instead, since our instance of VS Code is using port 80 already.
- Then, we’ll see the file we created,
hello.html, and we can see our page’s content, “hello, world”, on the page, and title, “hello, title”, in the tab bar. - Let’s look at the HTML again:
- The first line,
<!DOCTYPE html>, is a declaration that the page follows the HTML standard. - Next is a tag, a word in brackets like
<html>and</html>. The first is a start or open tag, and the second is a close tag, which looks almost the same but with a/in front of the tag’s name. In this case, the tags indicate the start and end of the HTML page. The start tag here has an attribute as well,lang="en"which specifies that the language of the page will be in English, to help the browser translate the page if needed. Notice that attributes are key-value pairs. - Nested within the
<html>tag are two more tags,<head>and<body>, which are both like children nodes in a tree. And within<head>is the<title>tag, the contents of which we see in a tab or window’s title in a browser. Within<body>is the contents of the page itself, a text node, which we’ll see in the main view of a browser as well.
- The first line,
- The page will be loaded into the browser’s memory as a data structure, like this tree:
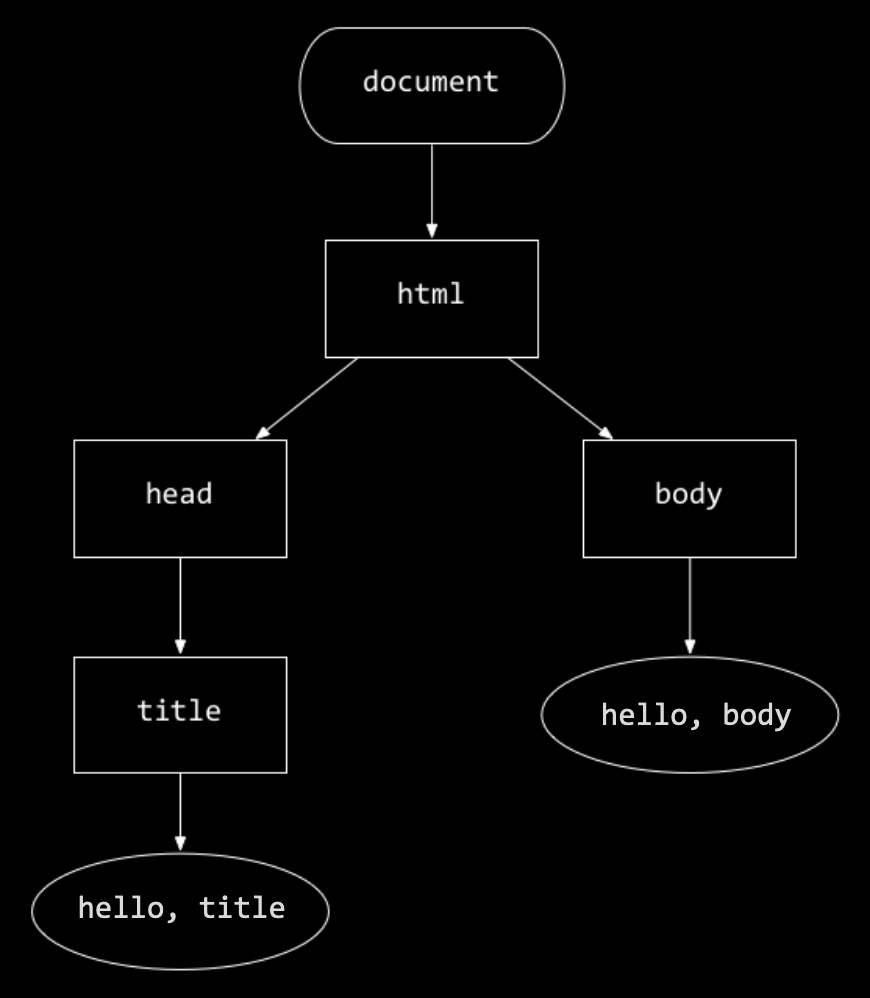
- Note that there is a hierarchy mapping each tag and its children. Rectangular nodes are tags, while oval ones are text.
- HTML allows us to build the structure of our web pages, and we can look for reference materials online for all the tags and attributes that we can use as building blocks.
- We can use a validator to check that our HTML is valid.
- We’ll take a look at
paragraphs0.html:<!DOCTYPE html> <html lang="en"> <head> <title>paragraphs</title> </head> <body> <p> Lorem ipsum dolor sit amet, consectetur adipiscing elit. Vivamus convallis scelerisque quam, vel hendrerit lectus viverra eu. Praesent posuere eget lectus ut faucibus. Etiam eu velit laoreet, gravida lorem in, viverra est. Cras ut purus neque. In porttitor non lorem id lobortis. Mauris gravida metus libero, quis maximus dui porta at. Donec lacinia felis consectetur venenatis scelerisque. Nulla eu nisl sollicitudin, varius velit sit amet, vehicula erat. Curabitur sollicitudin felis sit amet orci mattis, a tempus nulla pulvinar. Aliquam erat volutpat. </p> <p> Mauris ut dui in eros semper hendrerit. Morbi vel elit mi. Sed sit amet ex non quam dignissim dignissim et vel arcu. Pellentesque eget elementum orci. Morbi ac cursus ex. Pellentesque quis turpis blandit orci dapibus semper sed non nunc. Nulla et dolor nec lacus finibus volutpat. Sed non lorem diam. Donec feugiat interdum interdum. Vivamus et justo in enim blandit fermentum vel at elit. Phasellus eu ante vitae ligula varius aliquet. Etiam id posuere nibh. </p> <p> Aenean venenatis convallis ante a rhoncus. Nullam in metus vel diam vehicula tincidunt. Donec lacinia metus sem, sit amet egestas elit blandit sit amet. Nunc egestas sem quis nisl mattis semper. Pellentesque ut magna congue lorem eleifend sodales. Donec tortor tortor, aliquam vitae mollis sed, interdum ut lectus. Mauris non purus quis ipsum lacinia tincidunt. </p> </body> </html>- With the
<p>tag, we can indicate that each section of text should be a paragraph. - After we save this file, we’ll refresh the index of our web server, and then open
paragraphs.html, to see that each paragraph of text is separated by some spacing.
- With the
- We can add headings with tags like
<h1>,<h2>, and<h3>inheadings.html:<!DOCTYPE html> <html lang="en"> <head> <title>headings</title> </head> <body> <h1>One</h1> <p> Lorem ipsum dolor sit amet, consectetur adipiscing elit. Vivamus convallis scelerisque quam, vel hendrerit lectus viverra eu. Praesent posuere eget lectus ut faucibus. Etiam eu velit laoreet, gravida lorem in, viverra est. Cras ut purus neque. In porttitor non lorem id lobortis. Mauris gravida metus libero, quis maximus dui porta at. Donec lacinia felis consectetur venenatis scelerisque. Nulla eu nisl sollicitudin, varius velit sit amet, vehicula erat. Curabitur sollicitudin felis sit amet orci mattis, a tempus nulla pulvinar. Aliquam erat volutpat. </p> <h2>Two</h2> <p> Mauris ut dui in eros semper hendrerit. Morbi vel elit mi. Sed sit amet ex non quam dignissim dignissim et vel arcu. Pellentesque eget elementum orci. Morbi ac cursus ex. Pellentesque quis turpis blandit orci dapibus semper sed non nunc. Nulla et dolor nec lacus finibus volutpat. Sed non lorem diam. Donec feugiat interdum interdum. Vivamus et justo in enim blandit fermentum vel at elit. Phasellus eu ante vitae ligula varius aliquet. Etiam id posuere nibh. </p> <h3>Three</h3> <p> Aenean venenatis convallis ante a rhoncus. Nullam in metus vel diam vehicula tincidunt. Donec lacinia metus sem, sit amet egestas elit blandit sit amet. Nunc egestas sem quis nisl mattis semper. Pellentesque ut magna congue lorem eleifend sodales. Donec tortor tortor, aliquam vitae mollis sed, interdum ut lectus. Mauris non purus quis ipsum lacinia tincidunt. </p> </body> </html>- Each level of heading has a different size, and we can use up to six levels of headings with
<h6>.
- Each level of heading has a different size, and we can use up to six levels of headings with
- We take a look at
list0.html, where we use the<ul>tag to create an unordered list, like bullet points:<!DOCTYPE html> <html lang="en"> <head> <title>list</title> </head> <body> <ul> <li>foo</li> <li>bar</li> <li>baz</li> </ul> </body> </html>- We can also use
<ol>instead, for an ordered list with numbers.
- We can also use
- Tables start with a
<table>tag and have<tr>tags as rows, and<td>tags for individual cells:<!DOCTYPE html> <html lang="en"> <head> <title>table</title> </head> <body> <table> <thead> <tr> <th>Name</th> <th>Number</th> </tr> </thead> <tbody> <tr> <td>Carter</td> <td>+1-617-495-1000</td> </tr> <tr> <td>David</td> <td>+1-949-468-2750</td> </tr> </tbody> </table> </body> </html> - In
image.html, we can upload an image to our instance of VS Code and include it in our page with an<img>tag. We can also use thealtattribute to add alternative text for accessibility:<!DOCTYPE html> <html lang="en"> <head> <title>image</title> </head> <body> <img alt="Harvard University" src="harvard.jpg"> </body> </html>- It turns out the image is included at its full size, so we’ll use CSS later to set its width and height.
- We can also include videos with
video.html:<!DOCTYPE html> <html lang="en"> <head> <title>video</title> </head> <body> <video autoplay loop muted width="1280"> <source src="halloween.mp4" type="video/mp4"> </video> </body> </html>- We’ll use HTML attributes to change how our video is displayed. Notice that some attributes are empty, where there is no value.
- We’ll embed another page in ours with an inline frame, or iframe:
<!DOCTYPE html> <html lang="en"> <head> <title>iframe</title> </head> <body> <iframe allowfullscreen src="https://www.youtube.com/embed/xvFZjo5PgG0"></iframe> </body> </html> - We can create links in
link1.htmlwith the<a>, or anchor, tag:<!DOCTYPE html> <html lang="en"> <head> <title>link</title> </head> <body> Visit <a href="https://www.harvard.edu">Harvard</a>. </body> </html>- The
hrefattribute is for a hypertext reference, or simply where the link should take us, and within the tag is the text that should appear as the link. - When we visit this page, we can hover over the link, and our browser will show what the URL is.
- But we could set the
hreftohttps://www.yale.edu, but leaveHarvardwithin the tag, which might prank users or even trick them into visiting a fake version of some website. Phishing is an act of tricking users, a form of social engineering that includes misleading links. - We can link to other pages on our own server with just
image.htmlor something similar.
- The
- In
responsive.html, we can add attributes to make our page responsive, or automatically adapted for different screen sizes:<!DOCTYPE html> <html lang="en"> <head> <meta name="viewport" content="initial-scale=1, width=device-width"> <title>responsive</title> </head> <body> Lorem ipsum dolor sit amet, consectetur adipiscing elit. Vivamus convallis scelerisque quam, vel hendrerit lectus viverra eu. Praesent posuere eget lectus ut faucibus. Etiam eu velit laoreet, gravida lorem in, viverra est. Cras ut purus neque. In porttitor non lorem id lobortis. Mauris gravida metus libero, quis maximus dui porta at. Donec lacinia felis consectetur venenatis scelerisque. Nulla eu nisl sollicitudin, varius velit sit amet, vehicula erat. Curabitur sollicitudin felis sit amet orci mattis, a tempus nulla pulvinar. Aliquam erat volutpat. </body> </html>- We’ll open Chrome’s Developer Tools again, and in the top left of the panel, use the icon that looks like mobile devices to simulate a phone:
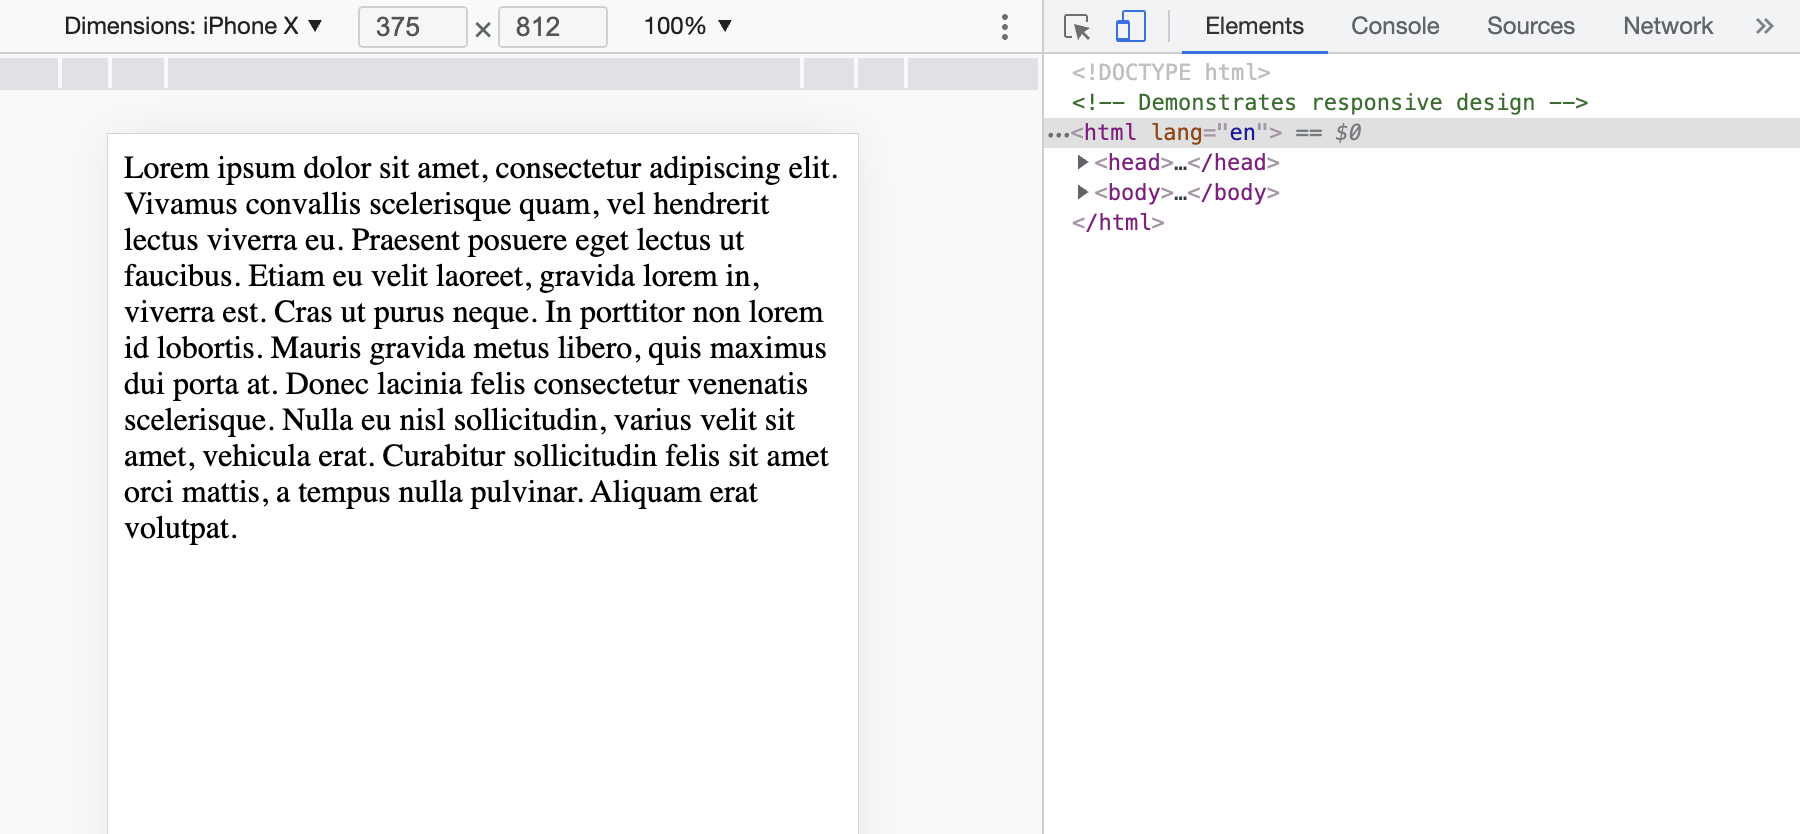
- We’ll open Chrome’s Developer Tools again, and in the top left of the panel, use the icon that looks like mobile devices to simulate a phone:
- It turns out that we can also provide inputs in a request as part of a URL like
https://wwww.example.com/path?key=value. Here, the?indicates that we’re adding inputs, which will include one or more key-value pairs. - If we search for something on Google, we’ll see that the URL changes to
https://www.google.com/search?q=cats&.... Here, theqkey, for “query”, has a value ofcats, along with other keys and values. - These inputs are part of GET requests that look like:
GET /search?q=cats HTTP/1.1 Host: www.google.com ...- We can also use POST, to send inputs like usernames and passwords, that should be hidden from the URL.
- In
search0.html, we can create a form that takes user input and sends it to Google’s search engine:<!DOCTYPE html> <html lang="en"> <head> <title>search</title> </head> <body> <form action="https://www.google.com/search" method="get"> <input name="q" type="text"> <input type="submit"> </form> </body> </html>- First, we have a
<form>tag that has anactionof Google’s search URL, with a method of GET. - Inside the form, we have one
<input>, with the nameq, and another<input>with the type ofsubmit. When the second input, a button, is clicked, the form will automatically add the input to the URL. - So when we open
search.htmlin our browser, we can use the form to search via Google.
- First, we have a
CSS
- Let’s make a home page:
<!DOCTYPE html> <html lang="en"> <head> <title>home</title> </head> <body> <p> John Harvard </p> <p> Welcome to my home page! </p> <p> Copyright (c) John Harvard </p> </body> </html>- We have three paragraphs, and we could use
<div>tags, or divisions, to indicate they are separate areas on our page.
- We have three paragraphs, and we could use
- We can also use HTML tags that add more context to our page:
<!DOCTYPE html> <html lang="en"> <head> <title>home</title> </head> <body> <header> John Harvard </header> <main> Welcome to my home page! </main> <footer> Copyright (c) John Harvard </footer> </body> </html> - We’ll stylize our page by adding a few aesthetics:
<!DOCTYPE html> <html lang="en"> <head> <title>home</title> </head> <body> <header style="font-size: large; text-align: center;"> John Harvard </header> <main style="font-size: medium; text-align: center;"> Welcome to my home page! </main> <footer style="font-size: small; text-align: center;"> Copyright © John Harvard </footer> </body> </html>- We’ll also use an HTML entity to represent the copyright symbol, which will be displayed in our browser as ©.
- In our
<style>tags, we’re using CSS, Cascading Style Sheets, another language that tells our browser how to display tags on a page. CSS uses properties, or key-value pairs, likefont-size: large;. - We can align all the text at once, instead of repeating ourselves:
<!DOCTYPE html> <html lang="en"> <head> <title>home</title> </head> <body style="text-align: center;"> <header style="font-size: large;"> John Harvard </header> <main style="font-size: medium;"> Welcome to my home page! </main> <footer style="font-size: small;"> Copyright © John Harvard </footer> </body> </html>- Here, the style applied to the
<body>tag cascades, or applies, to its children, so all the sections inside will have centered text as well.
- Here, the style applied to the
- To factor out, or separate our CSS from HTML, we can include styles in the
<head>tag:<!DOCTYPE html> <html lang="en"> <head> <style> body { text-align: center; } header { font-size: large; } main { font-size: medium; } footer { font-size: small; } </style> <title>home</title> </head> <body> <header> John Harvard </header> <main> Welcome to my home page! </main> <footer> Copyright © John Harvard </footer> </body> </html>- We can use a CSS type selector to style each type of tag.
- We can also use a more specific class selector:
<!DOCTYPE html> <html lang="en"> <head> <style> .centered { text-align: center; } .large { font-size: large; } .medium { font-size: medium; } .small { font-size: small; } </style> <title>css</title> </head> <body> <header class="centered large"> John Harvard </header> <main class="centered medium"> Welcome to my home page! </main> <footer class="centered small"> Copyright © John Harvard </footer> </body> </html>- We can define our own CSS class with a
.followed by a keyword we choose, so here we’ve created.centered,.large,.medium, and.small, each with some property. - Then, on any number of tags in our page’s HTML, we can add one or more of these classes with the
classattribute.
- We can define our own CSS class with a
- Finally, we can take all of the CSS for the properties and move them to another file with the
<link>tag:<!DOCTYPE html> <html lang="en"> <head> <link href="home.css" rel="stylesheet"> <title>home</title> </head> <body> <header class="centered large"> John Harvard </header> <main class="centered medium"> Welcome to my home page! </main> <footer class="centered small"> Copyright © John Harvard </footer> </body> </html>.centered { text-align: center; } .large { font-size: large; } .medium { font-size: medium; } .small { font-size: small; }- Now, we have a reusable CSS file.
- CSS also has ID selectors, like in
paragraphs1.html. It turns out that we can use Chrome’s Developer Tools here as well. We’ll use the Elements tab to see that the<head>of this page includes properties for#first, an ID in CSS that we can use only once, as well as a HTML tag<p id="first">that has the styles applied:
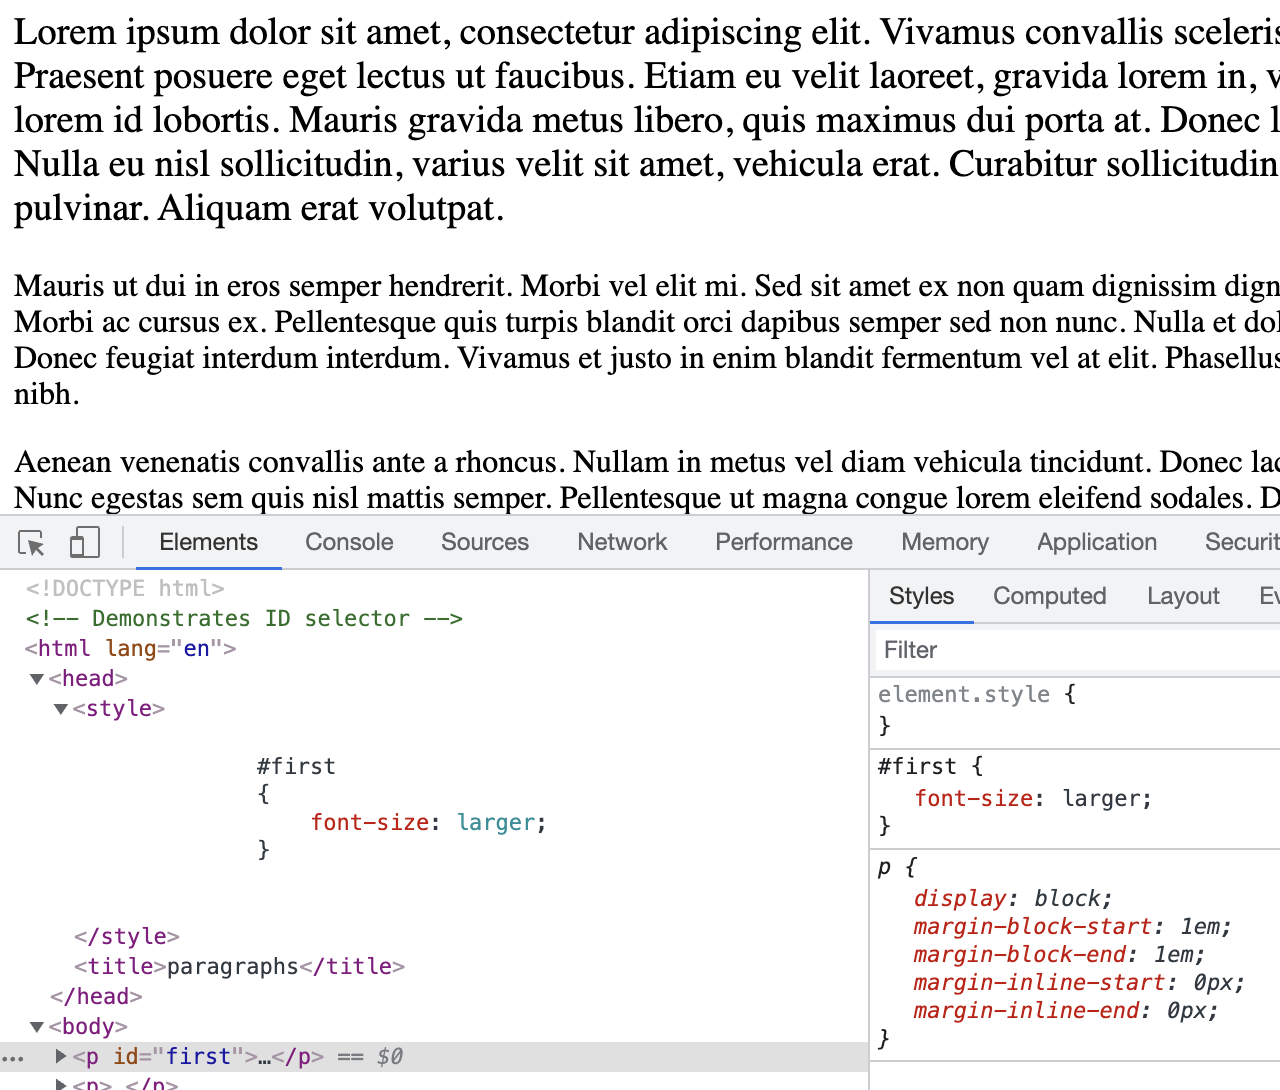
- We can click on an element in the HTML in this panel, and change the style of our page within our browser. We can hover over CSS properties on the right side, and uncheck or change them. This won’t change our original source code, but this will change our browser’s copy so we can experiment.
- We can also right-click on anything displayed on the page, and click “Inspect Element” to see it highlighted in the panel for us, where we can make more changes quickly or learn how other pages implement features.
- With CSS, we’ll also rely on references and other resources to look up how to use properties as we need them.
- We can use other types of selectors as well:
<!DOCTYPE html> <html lang="en"> <head> <style> p:first-child { font-size: larger; } </style> <title>paragraphs</title> </head> <body> <p> Lorem ipsum dolor sit amet, consectetur adipiscing elit. Vivamus convallis scelerisque quam, vel hendrerit lectus viverra eu. Praesent posuere eget lectus ut faucibus. Etiam eu velit laoreet, gravida lorem in, viverra est. Cras ut purus neque. In porttitor non lorem id lobortis. Mauris gravida metus libero, quis maximus dui porta at. Donec lacinia felis consectetur venenatis scelerisque. Nulla eu nisl sollicitudin, varius velit sit amet, vehicula erat. Curabitur sollicitudin felis sit amet orci mattis, a tempus nulla pulvinar. Aliquam erat volutpat. </p> <p> Mauris ut dui in eros semper hendrerit. Morbi vel elit mi. Sed sit amet ex non quam dignissim dignissim et vel arcu. Pellentesque eget elementum orci. Morbi ac cursus ex. Pellentesque quis turpis blandit orci dapibus semper sed non nunc. Nulla et dolor nec lacus finibus volutpat. Sed non lorem diam. Donec feugiat interdum interdum. Vivamus et justo in enim blandit fermentum vel at elit. Phasellus eu ante vitae ligula varius aliquet. Etiam id posuere nibh. </p> <p> Aenean venenatis convallis ante a rhoncus. Nullam in metus vel diam vehicula tincidunt. Donec lacinia metus sem, sit amet egestas elit blandit sit amet. Nunc egestas sem quis nisl mattis semper. Pellentesque ut magna congue lorem eleifend sodales. Donec tortor tortor, aliquam vitae mollis sed, interdum ut lectus. Mauris non purus quis ipsum lacinia tincidunt. </p> </body> </html>- Here, we’re using
p:first-childto set properties on the first<p>tag.
- Here, we’re using
- We’ll look at the style of
link2.html:a { color: #ff0000; text-decoration: none; } a:hover { text-decoration: underline; } - In
link4.html, we can select tags based on attributes:a { text-decoration: none; } a:hover { text-decoration: underline; } a[href="https://www.harvard.edu/"] { color: #ff0000; } a[href="https://www.yale.edu/"] { color: #0000ff; }- The attribute selectors will affect tags with those attributes, and we can use
a[href*="harvard.edu"]to be less specific in our selection, affecting tags withharvard.eduanywhere in itshref.
- The attribute selectors will affect tags with those attributes, and we can use
- A set of CSS conventions and shared styles is known as a framework, with classes and components we can quickly use.
- One popular framework is Bootstrap, with components like alerts that we can use with HTML like:
<div class="alert alert-warning"> ... </div>- The framework provides the CSS that sets the style for those classes.
- With the help of the documentation on Bootstrap’s website, we’ll include a
<link>to its CSS for our page with a table:<!DOCTYPE html> <html lang="en"> <head> <link href="https://cdn.jsdelivr.net/npm/bootstrap@5.1.3/dist/css/bootstrap.min.css" rel="stylesheet" integrity="sha384-1BmE4kWBq78iYhFldvKuhfTAU6auU8tT94WrHftjDbrCEXSU1oBoqyl2QvZ6jIW3" crossorigin="anonymous"> <title>table</title> </head> <body> <table class="table"> <thead> <tr> <th>Name</th> <th>Number</th> </tr> </thead> <tbody> <tr> <td>Carter</td> <td>+1-617-495-1000</td> </tr> <tr> <td>David</td> <td>+1-949-468-2750</td> </tr> </tbody> </table> </body> </html>- By adding the
tableclass, per the Boostrap documentation, we see that our table is indeed stylized to be easier to read.
- By adding the
- We’ll update our search page, too, with styles from Bootstrap:
<!DOCTYPE html> <html lang="en"> <head> <link href="https://cdn.jsdelivr.net/npm/bootstrap@5.1.3/dist/css/bootstrap.min.css" rel="stylesheet" integrity="sha384-1BmE4kWBq78iYhFldvKuhfTAU6auU8tT94WrHftjDbrCEXSU1oBoqyl2QvZ6jIW3" crossorigin="anonymous"> <title>search</title> </head> <body> <div class="container-fluid"> <ul class="m-3 nav"> <li class="nav-item"> <a class="nav-link text-dark" href="https://about.google/">About</a> </li> <li class="nav-item"> <a class="nav-link text-dark" href="https://store.google.com/">Store</a> </li> <li class="nav-item ms-auto"> <a class="nav-link text-dark" href="https://www.google.com/gmail/">Gmail</a> </li> <li class="nav-item"> <a class="nav-link text-dark" href="https://www.google.com/imghp">Images</a> </li> <li class="nav-item"> <a class="btn btn-primary" href="https://accounts.google.com/ServiceLogin" role="button">Sign in</a> </li> </ul> <div class="text-center"> <img alt="Happy Cat" class="img-fluid w-25" src="cat.gif"> <form action="https://www.google.com/search" class="mt-4" method="get"> <input autocomplete="off" autofocus class="form-control form-control-lg mb-4 mx-auto w-50" name="q" placeholder="Query" type="search"> <button class="btn btn-light" type="submit">Google Search</button> <button class="btn btn-light" name="btnI" type="submit">I'm Feeling Lucky</button> </form> </div> </div> </body> </html>- First, we’ll put everything in a
<div>that can grow to fit the screen. - Then, we’ll create a list with items and classes based on Bootstrap’s documentation, to display links and buttons in the header.
- Finally, we’ll add an image of a cat to the center of our page, as well as styles for our form.
- First, we’ll put everything in a
- Even with a framework, we can still write our own CSS styles to change any that we want.
JavaScript
- To write code that can run in users’ browsers, or on the client, we’ll use a new language, JavaScript. The code will still come from our web server, but it will be executed by the user’s browser.
- The syntax of JavaScript is similar to that of C and Python for basic constructs:
set [counter v] to (0)let counter = 0;change [counter v] by (1)counter = counter + 1; counter += 1; counter++;if <(x) < (y)> thenif (x < y) { }if <(x) < (y)> then elseif (x < y) { } else { }if <(x) < (y)> then else if <(x) > (y)> then elseif (x < y) { } else if (x > y) { } else { }foreverwhile (true) { }repeat (3)for (let i = 0; i < 3; i++) { }- Notice that in JavaScript we use
letto declare variables, without needing to indicate types.
- Notice that in JavaScript we use
- With JavaScript, we can change the HTML in the browser in real-time. We can use
<script>tags to include our code directly, or from a.jsfile. - We’ll create another form:
<!DOCTYPE html> <html lang="en"> <head> <script> function greet() { alert('hello, there'); } </script> <title>hello</title> </head> <body> <form onsubmit="greet(); return false;"> <input autocomplete="off" autofocus id="name" placeholder="Name" type="text"> <input type="submit"> </form> </body> </html>- Here, we won’t add an
actionto our form, since this will stay on the same page. Instead, we’ll have anonsubmitattribute that will call a function we’ve defined in JavaScript, and usereturn false;to prevent the form from actually being submitted anywhere. - In the
<head>tag, we’ll have a<script>tag with a function that defines a function,greet, in JavaScript. - Now, if we load that page, we’ll see
hello, therebeing shown when we submit the form.
- Here, we won’t add an
- Since our input tag, or element, has an ID of
name, we can use it in our code:<script> function greet() { let name = document.querySelector('#name').value; alert('hello, ' + name); } </script>documentis a global variable that comes with JavaScript in the browser, andquerySelectoris a function we can use to select a node in the DOM, Document Object Model, or the tree structure of the HTML page. After we select the element with the IDname, we get the textvalueinside the input, and add it to our alert.
- We can move our function to the bottom of the
<body>of the page, since we want the rest of the page to load first:<!DOCTYPE html> <html lang="en"> <head> <title>hello</title> </head> <body> <form> <input autocomplete="off" autofocus id="name" placeholder="Name" type="text"> <input type="submit"> </form> <script> function greet() { let name = document.querySelector('#name').value; alert('hello, ' + name); } document.querySelector('form').addEventListener('submit', greet); </script> </body> </html>- Now, we can listen to events in JavaScript, which occur when something happens on the page. For example, we can listen to the
submitevent on ourformelement, and call thegreetfunction when the event happens.
- Now, we can listen to events in JavaScript, which occur when something happens on the page. For example, we can listen to the
- We can also use anonymous functions in JavaScript:
<script> document.querySelector('form').addEventListener('submit', function(e) { let name = document.querySelector('#name').value; alert('hello, ' + name); e.preventDefault(); }); </script>- We can pass in a function with no name with the
function()syntax, and it turns out that event handlers in JavaScript get an event variable,eby convention, that we can use inside our function. Here, we usee.preventDefault();to stop the default behavior of the form.
- We can pass in a function with no name with the
- We can programmatically change style, too:
<!DOCTYPE html> <html lang="en"> <head> <title>background</title> </head> <body> <button id="red">R</button> <button id="green">G</button> <button id="blue">B</button> <script> let body = document.querySelector('body'); document.querySelector('#red').addEventListener('click', function() { body.style.backgroundColor = 'red'; }); document.querySelector('#green').addEventListener('click', function() { body.style.backgroundColor = 'green'; }); document.querySelector('#blue').addEventListener('click', function() { body.style.backgroundColor = 'blue'; }); </script> </body> </html>- After selecting an element, we can use the
styleproperty to set values for CSS properties as well. Here, we have three buttons, each of which has an event listener for theclickevent, that changes the background color of the<body>element.
- After selecting an element, we can use the
- We can also use JavaScript to make an element “blink”, or appear and reappear at an interval:
<!DOCTYPE html> <html lang="en"> <head> <script> // Toggles visibility of greeting function blink() { let body = document.querySelector('body'); if (body.style.visibility == 'hidden') { body.style.visibility = 'visible'; } else { body.style.visibility = 'hidden'; } } // Blink every 500ms window.setInterval(blink, 500); </script> <title>blink</title> </head> <body> hello, world </body> </html> - We can implement a form with autocomplete, using a dictionary of words and an event listener for the
keyupevent:<!DOCTYPE html> <html lang="en"> <head> <title>autocomplete</title> </head> <body> <input autocomplete="off" autofocus placeholder="Query" type="text"> <ul></ul> <script src="large.js"></script> <script> let input = document.querySelector('input'); input.addEventListener('keyup', function(event) { let html = ''; if (input.value) { for (word of WORDS) { if (word.startsWith(input.value)) { html += `<li>${word}</li>`; } } } document.querySelector('ul').innerHTML = html; }); </script> </body> </html>- If we visit
autocomplete.htmland start typing in the input box, we’ll see matching words appear below.
- If we visit
- With
geolocation.html, we can ask the browser for a user’s GPS coordinates:<!DOCTYPE html> <html lang="en"> <head> <title>geolocation</title> </head> <body> <script> navigator.geolocation.getCurrentPosition(function(position) { document.write(position.coords.latitude + ", " + position.coords.longitude); }); </script> </body> </html>- Now, we can use those coordinates to see our location on a map.